Nutrition Facts
0 servings


If you're looking for a simple, time-tested method for preserving pears, you’re in the right place. Today, I’m sharing the traditional technique my mom taught me for bottling pears—something she learned from her mom before her. Not only does this method keep your pears shelf-stable for years, but it also brings the comfort of homemade, wholesome fruit to your kitchen any time of year.
Whether you’re topping your granola with poached pears, baking a pear tart, or whipping up a pear upside-down cake, having preserved pears on hand makes life easier and tastier. The best part? Bottling pears is easier than you think—and incredibly satisfying.
Why Bottle Pears?
Bottling pears is one of the easiest and most rewarding ways to preserve seasonal fruit. Once jarred and sealed properly, these pears can last for years in a cool, dark pantry. It’s a practical way to enjoy the flavor of ripe, juicy pears even in the dead of winter—without relying on refrigeration or freezing.
You’ll also find bottled pears are incredibly versatile. Serve them with breakfast, use them in desserts, or eat them straight from the jar. This process is perfect whether you're making two jars or twenty.
What You’ll Need
Before you start, gather your supplies:
Fresh, ripe pears (5–6 medium pears per 1-liter jar)
Sterilized preserving jars and lids (traditional or recycled pickle jars work fine)
A sharp knife and a peeler
A large pot for poaching
A small pot for sterilizing lids and seals
Sugar and water (5:1 ratio to make the syrup)
How to Sterilize Jars and Lids
Wash your jars thoroughly and place them on a tray in a 100°C (212°F) oven for 5 minutes. This removes any moisture and ensures they are sterile. For the lids, boil them in water for a few minutes and let them sit in the hot water until you're ready to use them.
Making the Sugar Syrup
In a medium pot, mix 5 parts water to 1 part sugar (e.g., 2.5 liters water with 2 cups sugar). Heat this mixture until the sugar dissolves completely and the syrup begins to simmer. This light syrup is what you'll use to both poach the pears and fill the jars.
")
Preparing and Poaching the Pears
Peel the Pears – Use a vegetable peeler or wide-speed peeler to remove the skins completely. Any leftover skin will show in the jar, and if you're following Grandma’s rules—you'll lose points!
Quarter and Core – Slice the pears in half and remove the core with a sharp knife. Clean off any brown spots or blemishes.
Poach in Syrup – Place 6 quarters (about 3 pears) into the simmering sugar syrup and poach for about 3–4 minutes until knife-tender. Don’t overcook—they should hold their shape.
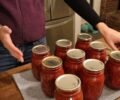
Packing the Jars
Now comes the fun part—packing your jars.
Layer the Pears – Use a spoon to gently arrange the poached pears in your sterilized jars. Pack them in neatly so they look attractive and fit snugly.
Add Syrup (Overflow Method) – Fill the jar with hot syrup until it overflows slightly. This helps eliminate any trapped air, which is key to long-term preservation.
")
Remove Air Bubbles – Use a butter knife to release any remaining bubbles by gently pushing the fruit aside along the jar’s edge.
Seal the Jar – Wipe the rim clean, then secure the lid. As the jar cools, the vacuum created will pull the lid down, forming a tight seal.
Let Them Cool and Store
Once sealed, let your jars cool at room temperature. You’ll hear the satisfying “pop” of the lid sealing—music to any preserver’s ears. Store your jars in a cool, dark place. Properly sealed pears can last for years and retain their texture and flavor beautifully.
Final Tips and Traditions
Use ripe but firm pears for best results.
")
Keep your tools and workspace clean throughout.
Don’t rush the process—take your time to get the details right.
Get into a rhythm: poach a batch, pack a jar, repeat.
")
If you're looking for a simple, time-tested method for preserving pears, you’re in the right place. Today, I’m sharing the traditional technique my mom taught me for bottling pears—something she learned from her mom before her. Not only does this method keep your pears shelf-stable for years, but it also brings the comfort of homemade, wholesome fruit to your kitchen any time of year.
Whether you’re topping your granola with poached pears, baking a pear tart, or whipping up a pear upside-down cake, having preserved pears on hand makes life easier and tastier. The best part? Bottling pears is easier than you think—and incredibly satisfying.
Why Bottle Pears?
Bottling pears is one of the easiest and most rewarding ways to preserve seasonal fruit. Once jarred and sealed properly, these pears can last for years in a cool, dark pantry. It’s a practical way to enjoy the flavor of ripe, juicy pears even in the dead of winter—without relying on refrigeration or freezing.
You’ll also find bottled pears are incredibly versatile. Serve them with breakfast, use them in desserts, or eat them straight from the jar. This process is perfect whether you're making two jars or twenty.
What You’ll Need
Before you start, gather your supplies:
Fresh, ripe pears (5–6 medium pears per 1-liter jar)
Sterilized preserving jars and lids (traditional or recycled pickle jars work fine)
A sharp knife and a peeler
A large pot for poaching
A small pot for sterilizing lids and seals
Sugar and water (5:1 ratio to make the syrup)
How to Sterilize Jars and Lids
Wash your jars thoroughly and place them on a tray in a 100°C (212°F) oven for 5 minutes. This removes any moisture and ensures they are sterile. For the lids, boil them in water for a few minutes and let them sit in the hot water until you're ready to use them.
Making the Sugar Syrup
In a medium pot, mix 5 parts water to 1 part sugar (e.g., 2.5 liters water with 2 cups sugar). Heat this mixture until the sugar dissolves completely and the syrup begins to simmer. This light syrup is what you'll use to both poach the pears and fill the jars.
Preparing and Poaching the Pears
Peel the Pears – Use a vegetable peeler or wide-speed peeler to remove the skins completely. Any leftover skin will show in the jar, and if you're following Grandma’s rules—you'll lose points!
Quarter and Core – Slice the pears in half and remove the core with a sharp knife. Clean off any brown spots or blemishes.
Poach in Syrup – Place 6 quarters (about 3 pears) into the simmering sugar syrup and poach for about 3–4 minutes until knife-tender. Don’t overcook—they should hold their shape.
Packing the Jars
Now comes the fun part—packing your jars.
Layer the Pears – Use a spoon to gently arrange the poached pears in your sterilized jars. Pack them in neatly so they look attractive and fit snugly.
Add Syrup (Overflow Method) – Fill the jar with hot syrup until it overflows slightly. This helps eliminate any trapped air, which is key to long-term preservation.
Remove Air Bubbles – Use a butter knife to release any remaining bubbles by gently pushing the fruit aside along the jar’s edge.
Seal the Jar – Wipe the rim clean, then secure the lid. As the jar cools, the vacuum created will pull the lid down, forming a tight seal.
Let Them Cool and Store
Once sealed, let your jars cool at room temperature. You’ll hear the satisfying “pop” of the lid sealing—music to any preserver’s ears. Store your jars in a cool, dark place. Properly sealed pears can last for years and retain their texture and flavor beautifully.
Final Tips and Traditions
Use ripe but firm pears for best results.
Keep your tools and workspace clean throughout.
Don’t rush the process—take your time to get the details right.
Get into a rhythm: poach a batch, pack a jar, repeat.
0 servings