When it comes to home canning, few things are as iconic—or delicious—as jars of sweet, golden peaches preserved at their peak. Alongside pickles and tomatoes, canned peaches are one of the most popular and beginner-friendly options for preserving summer’s bounty. This guide will walk you through the complete process of safely and efficiently canning fresh peaches in a light sugar syrup, so you can enjoy their juicy flavor all year long.
🥣 Why Can Peaches?
Peaches are one of the first fruits many people experience as a home-canned treat, often passed down through generations or seen in pop culture (even “The Simpsons” referenced them decades ago). Canning peaches locks in flavor, color, and texture, making them perfect for future pies, cobblers, or simply eating straight from the jar.
🍑 Best Peaches for Canning
For canning, it's ideal to use slightly under-ripe peaches. Firmer peaches hold their shape better during processing and look more attractive in jars. Overripe peaches, while still tasty, may break apart and appear mushy.
🧼 Step 1: Prepare the Peaches
Start with about 8 pounds of fresh peaches, which yields 4 quarts or 8 pints of canned slices.
Blanch to peel easily:
Score a shallow “X” on the bottom of each peach.
Boil in water for 1 minute (a few at a time).
Transfer immediately into an ice bath to loosen skins.
Peel the skins off with your hands—easy and mess-free!
Slice the peaches:
Cut around the pit to separate into halves.
Remove the pit.
Slice each half into thirds for better jar-packing efficiency.
🍯 Step 2: Make a Light Sugar Syrup
Peaches are naturally sweet, so a light syrup enhances their flavor without overpowering them.
Basic syrup ratio:
6 cups water
2 cups sugar
Bring the mixture to a gentle simmer until the sugar dissolves. While you can can peaches in plain water, sugar syrup helps retain flavor and color better over time.
")
🫙 Step 3: Prepare Your Jars
Since this recipe uses a hot water bath method:
Sterilize jars by boiling them for a few minutes.
Keep jars hot until filling to prevent breakage.
🍲 Step 4: Heat and Pack Peaches
Simmer peach slices in the syrup for 1 minute (1 quart’s worth at a time).
Pack hot peaches into jars, leaving ½ inch headspace.
Ladle in hot syrup until you reach the headspace mark.
Use a de-bubbling tool to remove trapped air.
Wipe the rims clean with a damp cloth (especially important with sticky syrup).
Add heated lids and screw on rings fingertip-tight.
♨️ Step 5: Process in a Water Bath
Check temperature differences between jars and canner water using an infrared thermometer to prevent cracking. Your jars should be close in temp to the water.
Place jars in the canner with at least 1 inch of water above them.
Bring to a rolling boil and process:
25 minutes for quarts
20 minutes for pints
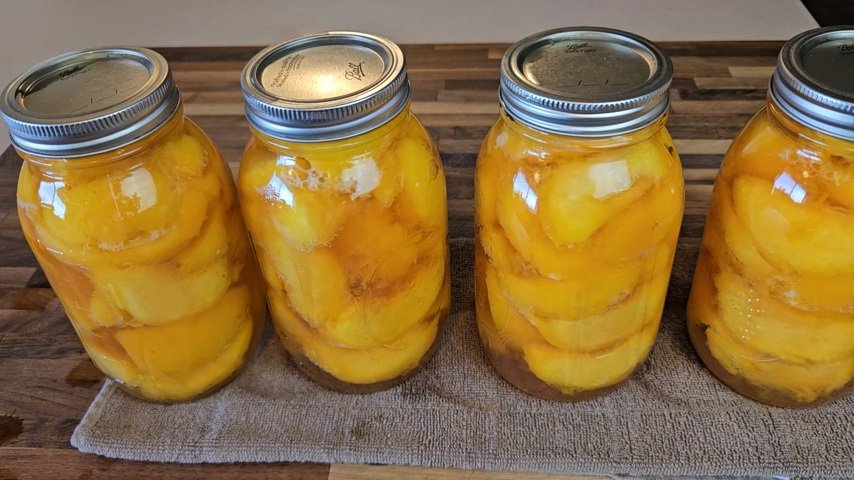
❄️ Step 6: Cool and Store
After processing:
Let jars rest in the canner for 5 minutes before removing.
Place them on a towel (not directly on a cold counter).
Listen for the satisfying “pop” of successful seals.
Let jars cool fully before removing rings and storing.
If a jar doesn't seal, place it in the fridge and use within two weeks.
")
🏡 Final Tips for Canning Peaches at Home
")
Always use a headspace measuring tool to ensure proper fill levels.
De-bubbling helps avoid false seals and spoilage.
Don’t overtighten the rings—fingertip tight is best.
Always label and date your jars after cooling.
Store in a cool, dark pantry for up to a year.
🧡 Enjoy Your Homemade Canned Peaches!
Whether you're stocking your pantry, giving homemade gifts, or just savoring the flavors of summer all year long, canning peaches is a rewarding and practical homesteading skill. With these easy-to-follow steps, you'll be confidently filling your shelves with bright, flavorful peaches that your family will love.
")
0 servings