Nutrition Facts
0 servings


If you're looking for a comforting and hearty homemade soup to enjoy during the colder months, then this canned beef vegetable soup recipe is for you! Chef JD Pendleton’s recipe is a holiday favorite, bringing warm, savory goodness to every bowl. Follow this step-by-step guide to prepare and preserve this delicious soup for long-term storage.
Ingredients for Canning Beef Vegetable Soup
")
Vegetables & Meat:
2 cloves of garlic (mashed)
1 large bag of baby carrots (chopped)
2 stalks of celery (chopped)
1 whole onion (chopped)
1 bag of assorted bell peppers (red, green, yellow, and orange, chopped)
2 cans of whole kernel corn (no salt added)
½ head of cabbage (chopped)
Yukon Gold potatoes (chopped, skin on)
1 cooked beef roast (chopped into small pieces)
Liquids & Seasoning:
Olive oil (for sautéing)
48 oz beef broth
1 can (46 oz) tomato juice
2 tsp canning salt
3 tbsp beef base (homemade or store-bought)
")
3-4 tbsp chili powder
2 ½ cups sugar
1 tbsp cayenne pepper
1 tsp celery salt
Additional salt and pepper to taste
Step-by-Step Guide to Canning Beef Vegetable Soup
Step 1: Prepare the Ingredients
Chop all vegetables and meat into uniform sizes. Yukon Gold potatoes are ideal as they hold their shape well during canning. Keep the pieces slightly larger than bite-sized to prevent mushiness.
Step 2: Sauté the Garlic and Vegetables
In a large pot, heat a small amount of olive oil and lightly sauté the mashed garlic. Add the chopped vegetables (excluding cabbage and potatoes) and toss them with more olive oil to distribute the garlic flavor evenly.
Step 3: Add the Meat and Broth
Once the vegetables are slightly softened, add the cooked beef roast and pour in the beef broth. Stir well to mix the ingredients thoroughly.
Step 4: Incorporate Tomato Juice and Seasonings
Add the tomato juice along with canning salt, beef base, chili powder, sugar, cayenne pepper, and celery salt. Stir well and taste, adjusting the sugar and spice levels to achieve a balanced flavor.
Step 5: Add Cabbage and Potatoes
Once the soup is seasoned to your liking, bring it to a gentle simmer. Add the chopped potatoes and cabbage last, as they require minimal pre-cooking before the canning process.
")
Step 6: Prepare the Canning Jars
Sterilize your jars by steaming them for 10–15 minutes or running them through a dishwasher cycle. If using a pressure canner, sterilization isn’t necessary, but it’s recommended for water bath canning. Keep lids hot but not boiling.
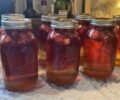
Step 7: Fill the Jars
Ladle the hot soup into sterilized jars, leaving a 1-inch headspace to allow for expansion. Wipe the rims clean with a hot water-dipped cloth to ensure a proper seal. Secure the lids and rings, tightening only to finger-tight.
Step 8: Pressure Can the Soup
Place filled jars into your pressure canner with at least ½ inch of water covering the bottom. Vent steam for 10 minutes before placing the 10-pound weight on the vent (adjust for altitude if necessary). Once at pressure, process jars for 90 minutes at 10 pounds of pressure.
")
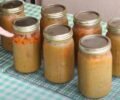
Step 9: Cooling and Sealing the Jars
Once the processing time is complete, turn off the heat and allow the canner to cool naturally. Do not remove the lid until pressure has fully dropped. After 5–10 minutes, carefully remove jars and place them on a towel to cool completely. You should hear the satisfying "pop" of the lids sealing.
Step 10: Storage and Serving
Check seals before storing jars in a cool, dark place. Properly sealed jars last up to a year. This rich, flavorful beef vegetable soup is a perfect ready-made meal for chilly evenings or holiday gatherings.
Enjoy your homemade, canned beef vegetable soup anytime with the convenience of a hearty meal straight from your pantry!
")
If you're looking for a comforting and hearty homemade soup to enjoy during the colder months, then this canned beef vegetable soup recipe is for you! Chef JD Pendleton’s recipe is a holiday favorite, bringing warm, savory goodness to every bowl. Follow this step-by-step guide to prepare and preserve this delicious soup for long-term storage.
Ingredients for Canning Beef Vegetable Soup
Vegetables & Meat:
2 cloves of garlic (mashed)
1 large bag of baby carrots (chopped)
2 stalks of celery (chopped)
1 whole onion (chopped)
1 bag of assorted bell peppers (red, green, yellow, and orange, chopped)
2 cans of whole kernel corn (no salt added)
½ head of cabbage (chopped)
Yukon Gold potatoes (chopped, skin on)
1 cooked beef roast (chopped into small pieces)
Liquids & Seasoning:
Olive oil (for sautéing)
48 oz beef broth
1 can (46 oz) tomato juice
2 tsp canning salt
3 tbsp beef base (homemade or store-bought)
3-4 tbsp chili powder
2 ½ cups sugar
1 tbsp cayenne pepper
1 tsp celery salt
Additional salt and pepper to taste
Step-by-Step Guide to Canning Beef Vegetable Soup
Step 1: Prepare the Ingredients
Chop all vegetables and meat into uniform sizes. Yukon Gold potatoes are ideal as they hold their shape well during canning. Keep the pieces slightly larger than bite-sized to prevent mushiness.
Step 2: Sauté the Garlic and Vegetables
In a large pot, heat a small amount of olive oil and lightly sauté the mashed garlic. Add the chopped vegetables (excluding cabbage and potatoes) and toss them with more olive oil to distribute the garlic flavor evenly.
Step 3: Add the Meat and Broth
Once the vegetables are slightly softened, add the cooked beef roast and pour in the beef broth. Stir well to mix the ingredients thoroughly.
Step 4: Incorporate Tomato Juice and Seasonings
Add the tomato juice along with canning salt, beef base, chili powder, sugar, cayenne pepper, and celery salt. Stir well and taste, adjusting the sugar and spice levels to achieve a balanced flavor.
Step 5: Add Cabbage and Potatoes
Once the soup is seasoned to your liking, bring it to a gentle simmer. Add the chopped potatoes and cabbage last, as they require minimal pre-cooking before the canning process.
Step 6: Prepare the Canning Jars
Sterilize your jars by steaming them for 10–15 minutes or running them through a dishwasher cycle. If using a pressure canner, sterilization isn’t necessary, but it’s recommended for water bath canning. Keep lids hot but not boiling.
Step 7: Fill the Jars
Ladle the hot soup into sterilized jars, leaving a 1-inch headspace to allow for expansion. Wipe the rims clean with a hot water-dipped cloth to ensure a proper seal. Secure the lids and rings, tightening only to finger-tight.
Step 8: Pressure Can the Soup
Place filled jars into your pressure canner with at least ½ inch of water covering the bottom. Vent steam for 10 minutes before placing the 10-pound weight on the vent (adjust for altitude if necessary). Once at pressure, process jars for 90 minutes at 10 pounds of pressure.
Step 9: Cooling and Sealing the Jars
Once the processing time is complete, turn off the heat and allow the canner to cool naturally. Do not remove the lid until pressure has fully dropped. After 5–10 minutes, carefully remove jars and place them on a towel to cool completely. You should hear the satisfying "pop" of the lids sealing.
Step 10: Storage and Serving
Check seals before storing jars in a cool, dark place. Properly sealed jars last up to a year. This rich, flavorful beef vegetable soup is a perfect ready-made meal for chilly evenings or holiday gatherings.
Enjoy your homemade, canned beef vegetable soup anytime with the convenience of a hearty meal straight from your pantry!
0 servings