Nutrition Facts
0 servings


If you’ve been digging through your pantry and finding just one lonely jar of a favorite veggie mix left—it's time to restock! In this post, I’ll walk you through how to can pickled cauliflower and carrots using a simple vinaigrette-style brine instead of fermentation. This version is shelf-stable and packed with crisp, tangy flavor—plus it’s incredibly easy to make.
Whether you’re new to canning or a seasoned homesteader, this recipe is a delicious way to preserve fresh produce for months to come.
")
🧼 First, A Pantry Check
Before starting this batch, I reorganized my closet pantry to take stock of what I had. I found:
15 quarts and around 15–16 pint jars of home-canned tomatoes (no need to make more for now).
A good stash of canned corn (still have plenty from last year).
Only one jar left of my pickled cauliflower and carrot mixture—time to make more!
That lone jar was likely fermented, but I no longer have the ideal cool storage space for long-term ferments. So, I decided to make a similar mix but preserve it with vinegar brine instead of fermentation—giving me a bright, zesty, and shelf-stable version that doesn’t require refrigeration.
🥕 Ingredients You'll Need
Here’s what I used for this small batch:
1 large head of cauliflower, chopped into small florets
3 medium carrots, peeled and sliced
4 cloves of garlic, peeled (2 per pint jar)
4 small hot peppers (optional, one per jar)
Salt (for both soaking and flavoring)
Water + Pickling Vinegar, 1:1 ratio (3 cups each to start)
Feel free to customize by adding red pepper strips, pearl onions, or olives if desired!
🔪 Prepping the Veggies
Carrots: Peeled and sliced—thin enough to pickle well, but thick enough to hold their crunch. I used a potato slicer, but you can do it by hand.
")
Cauliflower: Trimmed into small, uniform florets. I washed them in a saltwater bath to clean and draw out any debris.
Once both veggies were prepped, I mixed them together and salted them generously to draw out moisture. Let this mix sit for a bit while you prepare your jars and brine.
🔥 Make the Vinaigrette Brine
Combine:
3 cups white pickling vinegar
3 cups water
Bring to a boil. This 50/50 mix gives you a stronger brine than regular table vinegar and ensures shelf stability.
🫙 Blanching & Canning Steps
Blanch the veggies in boiling water for about 5 minutes—just to soften slightly while maintaining texture.
Prepare 4 pint jars—add:
2 cloves garlic per jar
1 hot pepper per jar
Pack the jars tightly with the cauliflower and carrots, leaving about 1-inch headspace.
Add ½ to 1 teaspoon salt to each jar.
")
Pour the hot vinegar-water brine over the vegetables, keeping that 1-inch headspace.
Wipe the rims, apply lids and rings, and process in a water bath canner for 10 minutes.
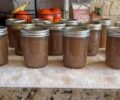
Let cool undisturbed for 12–24 hours. You should hear that satisfying "pop" as they seal.
🌶️ Final Thoughts
These jars turned out beautifully—bright, fresh, and packed with tangy flavor and crunch. You can enjoy them as a snack, side dish, or even part of an antipasto platter. Plus, they’re a great way to use up extra produce and keep your pantry stocked without relying on refrigeration.
This is a simple and flexible recipe—perfect for any level of canner.
")
If you’ve been digging through your pantry and finding just one lonely jar of a favorite veggie mix left—it's time to restock! In this post, I’ll walk you through how to can pickled cauliflower and carrots using a simple vinaigrette-style brine instead of fermentation. This version is shelf-stable and packed with crisp, tangy flavor—plus it’s incredibly easy to make.
Whether you’re new to canning or a seasoned homesteader, this recipe is a delicious way to preserve fresh produce for months to come.
🧼 First, A Pantry Check
Before starting this batch, I reorganized my closet pantry to take stock of what I had. I found:
15 quarts and around 15–16 pint jars of home-canned tomatoes (no need to make more for now).
A good stash of canned corn (still have plenty from last year).
Only one jar left of my pickled cauliflower and carrot mixture—time to make more!
That lone jar was likely fermented, but I no longer have the ideal cool storage space for long-term ferments. So, I decided to make a similar mix but preserve it with vinegar brine instead of fermentation—giving me a bright, zesty, and shelf-stable version that doesn’t require refrigeration.
🥕 Ingredients You'll Need
Here’s what I used for this small batch:
1 large head of cauliflower, chopped into small florets
3 medium carrots, peeled and sliced
4 cloves of garlic, peeled (2 per pint jar)
4 small hot peppers (optional, one per jar)
Salt (for both soaking and flavoring)
Water + Pickling Vinegar, 1:1 ratio (3 cups each to start)
Feel free to customize by adding red pepper strips, pearl onions, or olives if desired!
🔪 Prepping the Veggies
Carrots: Peeled and sliced—thin enough to pickle well, but thick enough to hold their crunch. I used a potato slicer, but you can do it by hand.
Cauliflower: Trimmed into small, uniform florets. I washed them in a saltwater bath to clean and draw out any debris.
Once both veggies were prepped, I mixed them together and salted them generously to draw out moisture. Let this mix sit for a bit while you prepare your jars and brine.
🔥 Make the Vinaigrette Brine
Combine:
3 cups white pickling vinegar
3 cups water
Bring to a boil. This 50/50 mix gives you a stronger brine than regular table vinegar and ensures shelf stability.
🫙 Blanching & Canning Steps
Blanch the veggies in boiling water for about 5 minutes—just to soften slightly while maintaining texture.
Prepare 4 pint jars—add:
2 cloves garlic per jar
1 hot pepper per jar
Pack the jars tightly with the cauliflower and carrots, leaving about 1-inch headspace.
Add ½ to 1 teaspoon salt to each jar.
Pour the hot vinegar-water brine over the vegetables, keeping that 1-inch headspace.
Wipe the rims, apply lids and rings, and process in a water bath canner for 10 minutes.
Let cool undisturbed for 12–24 hours. You should hear that satisfying "pop" as they seal.
🌶️ Final Thoughts
These jars turned out beautifully—bright, fresh, and packed with tangy flavor and crunch. You can enjoy them as a snack, side dish, or even part of an antipasto platter. Plus, they’re a great way to use up extra produce and keep your pantry stocked without relying on refrigeration.
This is a simple and flexible recipe—perfect for any level of canner.
0 servings