Nutrition Facts
0 servings

How to Can Plum Juice at Home Using a Steam Juicer
Easy Step-by-Step Water Bath Canning Guide
If you’ve got a plum tree in your backyard—or know someone who does—it’s time to take advantage of that seasonal abundance. Today, we’re walking through exactly how to make and can your own plum juice using a steam juicer and a water bath canner. Whether your plums are big and juicy or small from an aging tree, this method delivers rich, tart juice that can be sweetened and preserved for year-round enjoyment.
A Shoutout to Watcher Johnny
This project was inspired by fellow canning enthusiast Watcher Johnny, whose videos on plum juicing gave me the motivation to climb up on top of my garage and harvest two five-gallon buckets of plums from an old tree that’s likely in its final fruiting season. Even though the plums were on the smaller side, they produced a surprisingly generous amount of juice.
Why Use a Steam Juicer?
If you’ve never used a steam juicer, it’s a fantastic tool for extracting juice from fruits like plums, grapes, and apples without the need for a messy press. Here’s how it works:
Water in the bottom pot produces steam.
The steam rises through the center and cooks the fruit in the top strainer basket.
As the fruit breaks down, juice collects in the middle pot and flows out through a hose.
This method is clean, efficient, and perfect for softer fruits. In just 15 minutes, the plums started juicing rapidly, and I let the process run for about 45 minutes total.
What to Do With the Leftover Pulp?
Once the juice was extracted, the plum skins and pulp were left behind. You could strain the pulp further to make jam, fruit leather, or preserves, but in this case, I passed it on to the chickens—they were thrilled!
Sweetening the Juice
Fresh plum juice has a tart flavor, similar to cranberry juice. If you prefer a sweeter beverage, you can:
Sweeten to taste with sugar or honey while the juice is still warm.
For a smoother, grape juice-like flavor, I added some sweetener and was very pleased with the result.
How to Can Plum Juice – Step-by-Step
Tools You’ll Need:
Steam juicer
Water bath canner
Quart-size canning jars
Canning lids and rings
Jar lifter and funnel
")
Clean towel
1. Prepare the Juice
Wash and measure out 2 gallons of plums.
Steam for 45 minutes, collecting juice from the hose into a clean pot.
2. Get Ready to Can
Heat your canning jars, lids, and rings.
Keep the juice hot and at a simmer.
3. Fill the Jars
Use a funnel to pour hot plum juice into each jar.
Leave ¼ inch of headspace. (Tip: Too little headspace can cause problems with sealing.)
Wipe the rims clean, place the hot lids on, and screw the rings on to fingertip tightness.
4. Water Bath Processing
Place the filled jars in a boiling water bath canner.
Process for 15 minutes.
After turning off the heat, let jars sit in the canner for 5 minutes before removing them.
5. Cool and Store
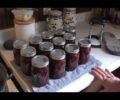
Set jars on a towel and let them cool completely.
The next day, remove the rings, wash the jars, and label them with “Plum Juice” and the canning date.
")
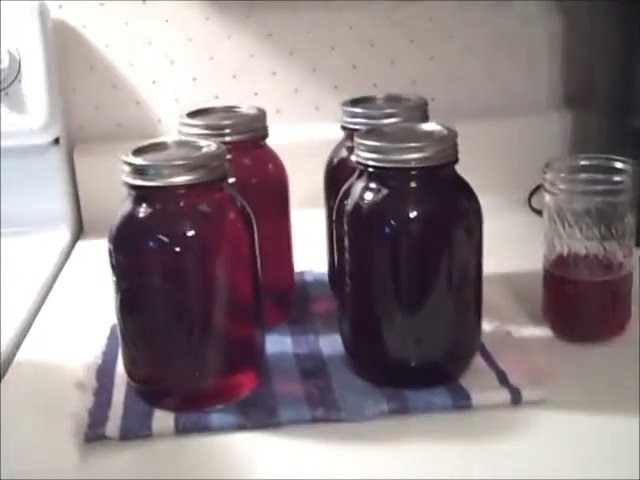
Final Yield and Storage Tips
From 2 gallons of plums, I ended up with 4 quarts of concentrated plum juice. When it's time to drink, I plan to dilute it with water to taste—making it stretch further and mellowing out the strong flavor.
Why You Should Can Plum Juice
Zero waste: You can use homegrown or foraged plums that might otherwise go to waste.
Shelf-stable: Properly canned juice lasts for up to 12–18 months on the pantry shelf.
Versatile: Enjoy it cold, warm, diluted, or even as a base for sauces and syrups.
Wrapping Up
")
Canning plum juice is a simple, satisfying project that lets you preserve the flavor of summer in a bottle. Whether you enjoy it straight, sweetened, or mixed into cocktails and recipes, homemade plum juice is a healthy, no-waste addition to your pantry.
")
How to Can Plum Juice at Home Using a Steam Juicer
Easy Step-by-Step Water Bath Canning Guide
If you’ve got a plum tree in your backyard—or know someone who does—it’s time to take advantage of that seasonal abundance. Today, we’re walking through exactly how to make and can your own plum juice using a steam juicer and a water bath canner. Whether your plums are big and juicy or small from an aging tree, this method delivers rich, tart juice that can be sweetened and preserved for year-round enjoyment.
A Shoutout to Watcher Johnny
This project was inspired by fellow canning enthusiast Watcher Johnny, whose videos on plum juicing gave me the motivation to climb up on top of my garage and harvest two five-gallon buckets of plums from an old tree that’s likely in its final fruiting season. Even though the plums were on the smaller side, they produced a surprisingly generous amount of juice.
Why Use a Steam Juicer?
If you’ve never used a steam juicer, it’s a fantastic tool for extracting juice from fruits like plums, grapes, and apples without the need for a messy press. Here’s how it works:
Water in the bottom pot produces steam.
The steam rises through the center and cooks the fruit in the top strainer basket.
As the fruit breaks down, juice collects in the middle pot and flows out through a hose.
This method is clean, efficient, and perfect for softer fruits. In just 15 minutes, the plums started juicing rapidly, and I let the process run for about 45 minutes total.
What to Do With the Leftover Pulp?
Once the juice was extracted, the plum skins and pulp were left behind. You could strain the pulp further to make jam, fruit leather, or preserves, but in this case, I passed it on to the chickens—they were thrilled!
Sweetening the Juice
Fresh plum juice has a tart flavor, similar to cranberry juice. If you prefer a sweeter beverage, you can:
Sweeten to taste with sugar or honey while the juice is still warm.
For a smoother, grape juice-like flavor, I added some sweetener and was very pleased with the result.
How to Can Plum Juice – Step-by-Step
Tools You’ll Need:
Steam juicer
Water bath canner
Quart-size canning jars
Canning lids and rings
Jar lifter and funnel
Clean towel
1. Prepare the Juice
Wash and measure out 2 gallons of plums.
Steam for 45 minutes, collecting juice from the hose into a clean pot.
2. Get Ready to Can
Heat your canning jars, lids, and rings.
Keep the juice hot and at a simmer.
3. Fill the Jars
Use a funnel to pour hot plum juice into each jar.
Leave ¼ inch of headspace. (Tip: Too little headspace can cause problems with sealing.)
Wipe the rims clean, place the hot lids on, and screw the rings on to fingertip tightness.
4. Water Bath Processing
Place the filled jars in a boiling water bath canner.
Process for 15 minutes.
After turning off the heat, let jars sit in the canner for 5 minutes before removing them.
5. Cool and Store
Set jars on a towel and let them cool completely.
The next day, remove the rings, wash the jars, and label them with “Plum Juice” and the canning date.
Final Yield and Storage Tips
From 2 gallons of plums, I ended up with 4 quarts of concentrated plum juice. When it's time to drink, I plan to dilute it with water to taste—making it stretch further and mellowing out the strong flavor.
Why You Should Can Plum Juice
Zero waste: You can use homegrown or foraged plums that might otherwise go to waste.
Shelf-stable: Properly canned juice lasts for up to 12–18 months on the pantry shelf.
Versatile: Enjoy it cold, warm, diluted, or even as a base for sauces and syrups.
Wrapping Up
Canning plum juice is a simple, satisfying project that lets you preserve the flavor of summer in a bottle. Whether you enjoy it straight, sweetened, or mixed into cocktails and recipes, homemade plum juice is a healthy, no-waste addition to your pantry.
0 servings