Nutrition Facts
0 servings

Fermented garlic in honey is not only delicious and versatile, but it’s also packed with natural health benefits. However, concerns about safety—particularly botulism risk—can cause hesitation. In this guide, we’ll walk you through how to ferment garlic in honey safely, the science behind it, and tips to keep your fermentation in the acidic safe zone.
Why Use Raw Honey for Fermentation?
To successfully ferment garlic in honey, raw, unpasteurized honey is essential. Unlike pasteurized honey, raw honey contains natural enzymes and beneficial microorganisms that support fermentation. Pasteurized honey has been heat-processed, which destroys these crucial microbes, making fermentation less likely and less safe.
Preparing Garlic for Honey Fermentation
You can use large or small garlic cloves—either will work fine. Simply peel the garlic and set it aside.
Now, before we proceed, it’s important to address a common concern: botulism.
Botulism and Fermented Garlic in Honey: Is It Safe?
Botulism is a rare but serious illness caused by neurotoxins released by Clostridium botulinum bacteria. While these bacteria are found in soil and marine sediments worldwide as harmless spores, they can become dangerous in certain conditions:
An oxygen-free environment
A pH above 4.6 (alkaline conditions)
This is why fermented foods must maintain an acidic environment. Raw honey is naturally acidic, typically with a pH around 3.8. However, garlic is alkaline, and when submerged in honey, its juices can raise the overall pH, potentially compromising safety.
How to Lower the pH for Safe Fermentation
To maintain acidity and reduce any risk of botulism, here’s a proven tip: Add 1 tablespoon of kombucha or vinegar to your fermentation jar. Both are highly acidic and will help counteract the alkalinity of garlic. This simple step helps keep the pH below 4.6 during the entire fermentation process.
Step-by-Step: How to Ferment Garlic in Honey
Ingredients:
Raw, unpasteurized honey
Fresh garlic cloves, peeled
1 tbsp kombucha (any flavor) or vinegar (plain or apple cider)
Instructions:
Place garlic cloves in a clean fermentation jar.
Add kombucha or vinegar over the garlic.
Pour raw honey into the jar until the garlic is fully covered.
Use a chopstick to gently stir and release trapped air bubbles.
Seal the jar tightly and flip it upside down, then right-side up again. Repeat this daily during the fermentation phase.
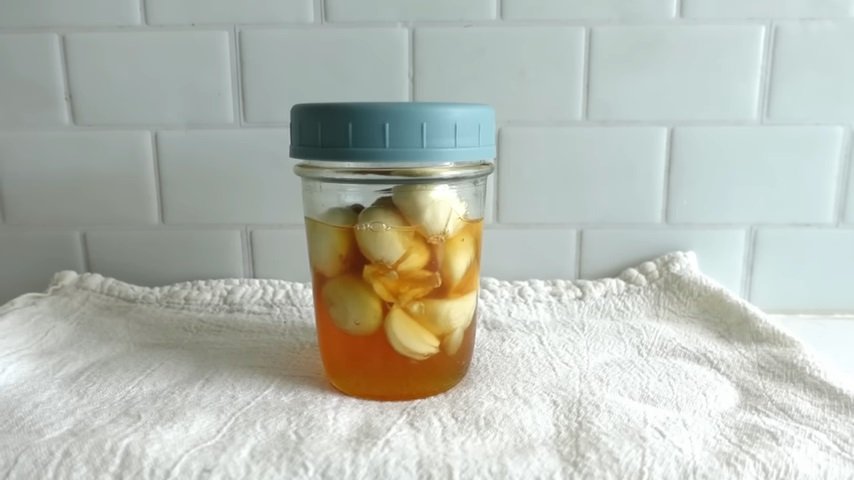
Leave the jar at room temperature for at least 14 days. Fermentation will begin within the first 24–48 hours, and you’ll see bubbles forming during the first week.
Monitoring the Fermentation Process
Turning the jar daily keeps the garlic coated in honey, preventing exposure to oxygen and minimizing surface mold. The bubbling will stop after about 10 days, and by day 21, the honey will be thinner, darker, and fully infused with garlic flavor.
")
How Long Should You Ferment Garlic in Honey?
You can begin enjoying your fermented garlic and honey after 14 days, but longer ferments (21–30+ days) allow deeper flavor and stronger preservation.
")
Here’s a pH comparison to illustrate the benefit of adding kombucha or vinegar:
Fermentation Method pH at Start Day 14 Day 30 3 Months
Without Kombucha 3.8 4.5 4.8 4.8
With Kombucha 3.0 3.5 4.2 4.2
As you can see, kombucha or vinegar maintains a safer, more acidic pH over time.
Can You Add Vinegar After Fermentation?
No. If botulism spores had released toxins during fermentation, adding vinegar after the fact will not neutralize those neurotoxins. To be effective, the kombucha or vinegar must be added at the beginning of the fermentation process.
Testing the pH of Fermented Honey and Garlic
If you’re serious about fermenting safely, consider using a digital pH meter designed for viscous foods. Standard meters for liquids or pH test strips don’t work well with honey and could give inaccurate readings—or break altogether. Look for a digital probe that’s easy to clean and has replaceable parts.
Final Thoughts
")
Fermenting garlic in honey is safe, easy, and incredibly beneficial when done correctly. By using raw honey, adding an acid booster like kombucha or vinegar, and monitoring the process, you can confidently enjoy your homemade fermented garlic and honey.
")
Fermented garlic in honey is not only delicious and versatile, but it’s also packed with natural health benefits. However, concerns about safety—particularly botulism risk—can cause hesitation. In this guide, we’ll walk you through how to ferment garlic in honey safely, the science behind it, and tips to keep your fermentation in the acidic safe zone.
Why Use Raw Honey for Fermentation?
To successfully ferment garlic in honey, raw, unpasteurized honey is essential. Unlike pasteurized honey, raw honey contains natural enzymes and beneficial microorganisms that support fermentation. Pasteurized honey has been heat-processed, which destroys these crucial microbes, making fermentation less likely and less safe.
Preparing Garlic for Honey Fermentation
You can use large or small garlic cloves—either will work fine. Simply peel the garlic and set it aside.
Now, before we proceed, it’s important to address a common concern: botulism.
Botulism and Fermented Garlic in Honey: Is It Safe?
Botulism is a rare but serious illness caused by neurotoxins released by Clostridium botulinum bacteria. While these bacteria are found in soil and marine sediments worldwide as harmless spores, they can become dangerous in certain conditions:
An oxygen-free environment
A pH above 4.6 (alkaline conditions)
This is why fermented foods must maintain an acidic environment. Raw honey is naturally acidic, typically with a pH around 3.8. However, garlic is alkaline, and when submerged in honey, its juices can raise the overall pH, potentially compromising safety.
How to Lower the pH for Safe Fermentation
To maintain acidity and reduce any risk of botulism, here’s a proven tip: Add 1 tablespoon of kombucha or vinegar to your fermentation jar. Both are highly acidic and will help counteract the alkalinity of garlic. This simple step helps keep the pH below 4.6 during the entire fermentation process.
Step-by-Step: How to Ferment Garlic in Honey
Ingredients:
Raw, unpasteurized honey
Fresh garlic cloves, peeled
1 tbsp kombucha (any flavor) or vinegar (plain or apple cider)
Instructions:
Place garlic cloves in a clean fermentation jar.
Add kombucha or vinegar over the garlic.
Pour raw honey into the jar until the garlic is fully covered.
Use a chopstick to gently stir and release trapped air bubbles.
Seal the jar tightly and flip it upside down, then right-side up again. Repeat this daily during the fermentation phase.
Leave the jar at room temperature for at least 14 days. Fermentation will begin within the first 24–48 hours, and you’ll see bubbles forming during the first week.
Monitoring the Fermentation Process
Turning the jar daily keeps the garlic coated in honey, preventing exposure to oxygen and minimizing surface mold. The bubbling will stop after about 10 days, and by day 21, the honey will be thinner, darker, and fully infused with garlic flavor.
How Long Should You Ferment Garlic in Honey?
You can begin enjoying your fermented garlic and honey after 14 days, but longer ferments (21–30+ days) allow deeper flavor and stronger preservation.
Here’s a pH comparison to illustrate the benefit of adding kombucha or vinegar:
Fermentation Method pH at Start Day 14 Day 30 3 Months
Without Kombucha 3.8 4.5 4.8 4.8
With Kombucha 3.0 3.5 4.2 4.2
As you can see, kombucha or vinegar maintains a safer, more acidic pH over time.
Can You Add Vinegar After Fermentation?
No. If botulism spores had released toxins during fermentation, adding vinegar after the fact will not neutralize those neurotoxins. To be effective, the kombucha or vinegar must be added at the beginning of the fermentation process.
Testing the pH of Fermented Honey and Garlic
If you’re serious about fermenting safely, consider using a digital pH meter designed for viscous foods. Standard meters for liquids or pH test strips don’t work well with honey and could give inaccurate readings—or break altogether. Look for a digital probe that’s easy to clean and has replaceable parts.
Final Thoughts
Fermenting garlic in honey is safe, easy, and incredibly beneficial when done correctly. By using raw honey, adding an acid booster like kombucha or vinegar, and monitoring the process, you can confidently enjoy your homemade fermented garlic and honey.
0 servings