Nutrition Facts
0 servings

If you've been looking for a delicious way to preserve fresh produce and stock your pantry with flavorful, long-lasting goods, pickled beets are a fantastic option. In this post, I’ll walk you through the entire process of making and canning pickled beets from start to finish—perfect for beginners and seasoned canners alike.
A Productive Week of Canning
The past few days have been a flurry of canning activity in my kitchen. I've preserved tomatoes (including crushed and diced), green beans, and now I'm diving into one of my family’s all-time favorites—pickled beets. These never last long in our household, so I'm processing a full 10-pound bag this time around.
Why Pickled Beets?
Pickled beets are not only easy to make, but they’re also vibrant, flavorful, and perfect for adding a touch of color and nutrition to any meal. They're great for pantry storage, inexpensive to make, and they’re absolutely delicious—especially when made with care at home.
Step-by-Step Guide to Making Pickled Beets
Step 1: Wash and Boil the Beets
Start by thoroughly rinsing your beets to remove any dirt. I like to soak them in the sink and use a scrub brush if needed. These weren’t homegrown, so the ends were already trimmed—meaning they may bleed a bit while boiling. If you're using garden-fresh beets, leave a couple of inches of the stem intact to reduce bleeding.
Once clean, place them in a large pot (I use my pressure canner as a stockpot) and cover with water. Bring to a boil, then reduce to a simmer for about 15–20 minutes until fork-tender. Smaller beets cook faster, while larger ones may take longer.
Step 2: Peel and Chop
When the beets have cooled enough to handle, the skins should slip right off easily. Cut off any remaining stem ends or blemishes, then chop the beets into your preferred size. I love chunky pieces, but slices work just as well.
Step 3: Make the Pickling Brine
Here’s the basic brine recipe I use for 10 pounds of beets:
4 cups vinegar
2 cups sugar
2 cups water (I use the cold water I soaked the peeled beets in)
1 tablespoon pickling salt
1 generous handful of whole cloves
Optional: a handful of pickling spice for extra flavor
Combine all ingredients in a pot and bring to a boil. Let it simmer for about 10 minutes to infuse the spices.
Step 4: Fill and Seal the Jars
I like to fill my jars in the sink to make cleanup easier. Place the chopped beets in sterilized jars, leaving about 1 inch of headspace. Pour the hot brine over the beets, making sure they’re fully covered. Remove air bubbles with a debubbler tool or a clean spatula.
Wipe the rims with a vinegar-dampened paper towel, place your lids and rings, and tighten them finger-tight.
Step 5: Water Bath Canning
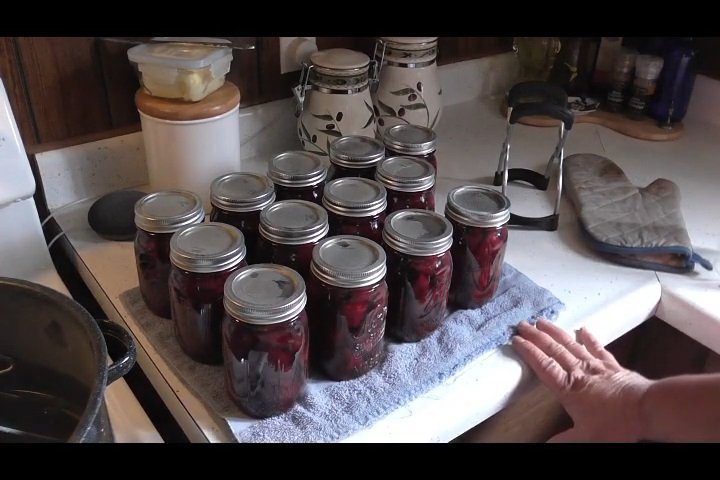
Place your filled jars into a boiling water bath canner. Ensure they are completely submerged under at least an inch of water. Once the water returns to a boil, process pint jars for 10 minutes.
After processing, let the jars sit in the canner for a few minutes, then carefully remove them to cool on a towel-lined counter.
The Final Result
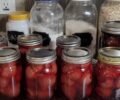
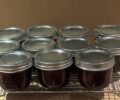
I ended up with 13 beautiful pints of pickled beets. Their rich, dark color is stunning—far more vibrant than plain sliced beets—and they look amazing on the pantry shelf. Plus, they’re incredibly flavorful thanks to the vinegar and spice blend.
")
Pickled beets are one of the easiest and most rewarding canning projects you can take on. They're affordable, shelf-stable, and a big hit in most households.
")
Why You’ll Love This Recipe
Budget-friendly pantry staple
Perfect for beginners
Customizable with your favorite spices
")
Long shelf life
Great for gift giving or holiday meals
So if you're wondering what to do with that big bag of beets, grab your jars and give this recipe a try. You’ll have beautifully canned pickled beets in no time—ready to enjoy all year round.
Thanks for stopping by, friends, and happy canning!
")
If you've been looking for a delicious way to preserve fresh produce and stock your pantry with flavorful, long-lasting goods, pickled beets are a fantastic option. In this post, I’ll walk you through the entire process of making and canning pickled beets from start to finish—perfect for beginners and seasoned canners alike.
A Productive Week of Canning
The past few days have been a flurry of canning activity in my kitchen. I've preserved tomatoes (including crushed and diced), green beans, and now I'm diving into one of my family’s all-time favorites—pickled beets. These never last long in our household, so I'm processing a full 10-pound bag this time around.
Why Pickled Beets?
Pickled beets are not only easy to make, but they’re also vibrant, flavorful, and perfect for adding a touch of color and nutrition to any meal. They're great for pantry storage, inexpensive to make, and they’re absolutely delicious—especially when made with care at home.
Step-by-Step Guide to Making Pickled Beets
Step 1: Wash and Boil the Beets
Start by thoroughly rinsing your beets to remove any dirt. I like to soak them in the sink and use a scrub brush if needed. These weren’t homegrown, so the ends were already trimmed—meaning they may bleed a bit while boiling. If you're using garden-fresh beets, leave a couple of inches of the stem intact to reduce bleeding.
Once clean, place them in a large pot (I use my pressure canner as a stockpot) and cover with water. Bring to a boil, then reduce to a simmer for about 15–20 minutes until fork-tender. Smaller beets cook faster, while larger ones may take longer.
Step 2: Peel and Chop
When the beets have cooled enough to handle, the skins should slip right off easily. Cut off any remaining stem ends or blemishes, then chop the beets into your preferred size. I love chunky pieces, but slices work just as well.
Step 3: Make the Pickling Brine
Here’s the basic brine recipe I use for 10 pounds of beets:
4 cups vinegar
2 cups sugar
2 cups water (I use the cold water I soaked the peeled beets in)
1 tablespoon pickling salt
1 generous handful of whole cloves
Optional: a handful of pickling spice for extra flavor
Combine all ingredients in a pot and bring to a boil. Let it simmer for about 10 minutes to infuse the spices.
Step 4: Fill and Seal the Jars
I like to fill my jars in the sink to make cleanup easier. Place the chopped beets in sterilized jars, leaving about 1 inch of headspace. Pour the hot brine over the beets, making sure they’re fully covered. Remove air bubbles with a debubbler tool or a clean spatula.
Wipe the rims with a vinegar-dampened paper towel, place your lids and rings, and tighten them finger-tight.
Step 5: Water Bath Canning
Place your filled jars into a boiling water bath canner. Ensure they are completely submerged under at least an inch of water. Once the water returns to a boil, process pint jars for 10 minutes.
After processing, let the jars sit in the canner for a few minutes, then carefully remove them to cool on a towel-lined counter.
The Final Result
I ended up with 13 beautiful pints of pickled beets. Their rich, dark color is stunning—far more vibrant than plain sliced beets—and they look amazing on the pantry shelf. Plus, they’re incredibly flavorful thanks to the vinegar and spice blend.
Pickled beets are one of the easiest and most rewarding canning projects you can take on. They're affordable, shelf-stable, and a big hit in most households.
Why You’ll Love This Recipe
Budget-friendly pantry staple
Perfect for beginners
Customizable with your favorite spices
Long shelf life
Great for gift giving or holiday meals
So if you're wondering what to do with that big bag of beets, grab your jars and give this recipe a try. You’ll have beautifully canned pickled beets in no time—ready to enjoy all year round.
Thanks for stopping by, friends, and happy canning!
0 servings