Nutrition Facts
0 servings


If you're looking for a quick and easy canning project, this Pineapple Apricot Jelly is a fantastic choice! Whether you're a beginner or an experienced canner, this recipe is simple, delicious, and a great way to preserve fruit for future enjoyment. Follow along as we go step by step to create a batch of this sweet and tangy jelly.
")
Ingredients You'll Need:
1 cup of chopped, rehydrated dried apricots
2 cans of crushed pineapple (high-quality brand recommended)
2 packages of powdered pectin
6 cups of granulated sugar
2 tablespoons of high-quality lemon juice
1 small knob of butter (to reduce foaming)
Step-by-Step Instructions:
1. Preparing the Apricots
If you don’t have fresh apricots, dried ones work perfectly. Simply soak them in hot water for about 30 minutes until they are soft and easy to chop. Once rehydrated, measure out one cup of packed apricots.
2. Mixing the Ingredients
In a large pot, combine the crushed pineapple and rehydrated apricots. Add the lemon juice for acidity and pectin to help the jelly set properly. Stir well to ensure the pectin is evenly distributed.
3. Cooking the Jelly
Turn the burner on and bring the mixture to a boil. Add the sugar all at once and stir continuously. Allow the mixture to come to a rolling boil that cannot be stirred down, then maintain this boil for one full minute.
")
4. Adding the Finishing Touches
To prevent excessive foaming, add a small knob of butter while the jelly is cooking. Stir it in well and prepare your sterilized jars for filling.
")
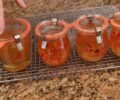
5. Filling and Sealing the Jars
Ladle the hot jelly into prepared jars, leaving a small amount of headspace. Wipe the rims clean with a mixture of vinegar and water to remove any sticky residue. Place lids and rings on the jars, tightening them to fingertip tightness.
")
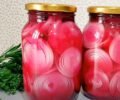
6. Water Bath Canning
")
Place the filled jars in a hot water bath canner and process them for 15 minutes. Once the time is up, let the jars sit in the canner for an additional 10 minutes before removing them to cool.
")
7. Cooling and Storing
After removing the jars, allow them to cool completely. Listen for the satisfying "pop" of the lids sealing properly. Once cooled, store your pineapple apricot jelly in a cool, dark place until ready to enjoy.
Why You'll Love This Recipe
Easy to Make – This is a beginner-friendly recipe with simple steps.
Versatile Uses – Enjoy it on toast, as a topping for desserts, or paired with peanut butter for a delicious sandwich.
Great for Gifts – Homemade jelly makes a wonderful, thoughtful present for friends and family.
Give this Pineapple Apricot Jelly a try and enjoy the sweet, tropical flavors in every bite.happy canning!
")
If you're looking for a quick and easy canning project, this Pineapple Apricot Jelly is a fantastic choice! Whether you're a beginner or an experienced canner, this recipe is simple, delicious, and a great way to preserve fruit for future enjoyment. Follow along as we go step by step to create a batch of this sweet and tangy jelly.
Ingredients You'll Need:
1 cup of chopped, rehydrated dried apricots
2 cans of crushed pineapple (high-quality brand recommended)
2 packages of powdered pectin
6 cups of granulated sugar
2 tablespoons of high-quality lemon juice
1 small knob of butter (to reduce foaming)
Step-by-Step Instructions:
1. Preparing the Apricots
If you don’t have fresh apricots, dried ones work perfectly. Simply soak them in hot water for about 30 minutes until they are soft and easy to chop. Once rehydrated, measure out one cup of packed apricots.
2. Mixing the Ingredients
In a large pot, combine the crushed pineapple and rehydrated apricots. Add the lemon juice for acidity and pectin to help the jelly set properly. Stir well to ensure the pectin is evenly distributed.
3. Cooking the Jelly
Turn the burner on and bring the mixture to a boil. Add the sugar all at once and stir continuously. Allow the mixture to come to a rolling boil that cannot be stirred down, then maintain this boil for one full minute.
4. Adding the Finishing Touches
To prevent excessive foaming, add a small knob of butter while the jelly is cooking. Stir it in well and prepare your sterilized jars for filling.
5. Filling and Sealing the Jars
Ladle the hot jelly into prepared jars, leaving a small amount of headspace. Wipe the rims clean with a mixture of vinegar and water to remove any sticky residue. Place lids and rings on the jars, tightening them to fingertip tightness.
6. Water Bath Canning
Place the filled jars in a hot water bath canner and process them for 15 minutes. Once the time is up, let the jars sit in the canner for an additional 10 minutes before removing them to cool.
7. Cooling and Storing
After removing the jars, allow them to cool completely. Listen for the satisfying "pop" of the lids sealing properly. Once cooled, store your pineapple apricot jelly in a cool, dark place until ready to enjoy.
Why You'll Love This Recipe
Easy to Make – This is a beginner-friendly recipe with simple steps.
Versatile Uses – Enjoy it on toast, as a topping for desserts, or paired with peanut butter for a delicious sandwich.
Great for Gifts – Homemade jelly makes a wonderful, thoughtful present for friends and family.
Give this Pineapple Apricot Jelly a try and enjoy the sweet, tropical flavors in every bite.happy canning!
0 servings