Nutrition Facts
0 servings


If you're passionate about homemade condiments and traditional food preservation, making your own ground mustard is a flavorful and rewarding kitchen project. This guide will walk you through every step of creating a bold, tangy ground mustard from scratch using both brown and yellow mustard seeds. Perfect for canning enthusiasts and mustard lovers alike, this recipe is easy, affordable, and yields jars of rich, zesty goodness ready for your pantry or gift-giving.
Ingredients You’ll Need:
To start your homemade ground mustard, gather the following ingredients:
½ cup brown mustard seeds
½ cup yellow mustard seeds
1 ½ cups apple cider vinegar (store-bought organic recommended for this recipe)
⅔ cup water
2 teaspoons pink Himalayan salt
💡 Tip: Buy mustard seeds in bulk
")
online for the best value. Three pounds of seeds can last through several batches and are great for pickling and fermenting as well.
Step 1: Soak the Mustard Seeds Overnight
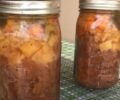
Start by adding your brown and yellow mustard seeds into a quart-sized jar. Pour in the water and apple cider vinegar, followed by the salt. Stir thoroughly, put a lid on the jar, and let it sit overnight at room temperature. The seeds will absorb the liquid and swell—doubling or even tripling in size.
This soaking process softens the seeds and intensifies the mustard flavor, making for a smoother blend the next day.
Step 2: Blend into Mustard
Once your seeds have soaked overnight, transfer the mixture to a blender or food processor. Blend until you reach your desired consistency. This can take anywhere from 2 to 10 minutes, depending on how coarse or smooth you prefer your mustard.
✅ It’s okay to leave a few whole seeds for texture—this is a ground mustard, not a smooth Dijon!
Step 3: Heat the Mustard
Pour the blended mustard into a saucepan and warm it over low heat. This helps thicken the mustard further and blends the flavors. Be sure to stir constantly to avoid scorching—it can burn quickly!
")
Heating isn’t for cooking the mustard, just thickening it slightly and making it ready for safe canning.
Step 4: Jar and Can Your Mustard
Ladle the hot mustard into sterilized 4-ounce jelly jars, leaving ½ inch of headspace. Wipe the rims with vinegar, apply hot lids and rings (finger-tight), and process in a boiling water bath for 10 minutes.
🫙 Four-ounce jars are a great size for household use and make thoughtful homemade gifts.
")
Step 5: Let It Age
Once cooled and sealed, let your jars sit for at least 2 to 4 weeks before using. This aging process mellows out the intense heat and bite of the fresh mustard, giving you a smooth, balanced flavor. If you love extra-strong mustard, you can try it after just 2 weeks.
🌶 Want to kick up the heat? Add a bit of horseradish during the blending process for a spicy twist.
Why Make Your Own Mustard?
Homemade ground mustard isn't just tastier than store-bought—it's also customizable, preservable, and more economical. You control the ingredients, spice levels, and consistency, and you can avoid unnecessary preservatives or additives. Plus, it's another great way to use your pantry staples like vinegar and salt for preserving.
Whether you're spreading it on sandwiches, stirring it into vinaigrettes, or slathering it on smoked pork, this homemade mustard brings a rustic, rich flavor that elevates any dish.
")
Final Thoughts
If you’ve been curious about making your own condiments or preserving more of your pantry staples, this homemade ground mustard is a perfect project to get started. Simple ingredients, minimal equipment, and big flavor—plus the satisfaction of filling your shelves with something homemade.
")
If you're passionate about homemade condiments and traditional food preservation, making your own ground mustard is a flavorful and rewarding kitchen project. This guide will walk you through every step of creating a bold, tangy ground mustard from scratch using both brown and yellow mustard seeds. Perfect for canning enthusiasts and mustard lovers alike, this recipe is easy, affordable, and yields jars of rich, zesty goodness ready for your pantry or gift-giving.
Ingredients You’ll Need:
To start your homemade ground mustard, gather the following ingredients:
½ cup brown mustard seeds
½ cup yellow mustard seeds
1 ½ cups apple cider vinegar (store-bought organic recommended for this recipe)
⅔ cup water
2 teaspoons pink Himalayan salt
💡 Tip: Buy mustard seeds in bulk
online for the best value. Three pounds of seeds can last through several batches and are great for pickling and fermenting as well.
Step 1: Soak the Mustard Seeds Overnight
Start by adding your brown and yellow mustard seeds into a quart-sized jar. Pour in the water and apple cider vinegar, followed by the salt. Stir thoroughly, put a lid on the jar, and let it sit overnight at room temperature. The seeds will absorb the liquid and swell—doubling or even tripling in size.
This soaking process softens the seeds and intensifies the mustard flavor, making for a smoother blend the next day.
Step 2: Blend into Mustard
Once your seeds have soaked overnight, transfer the mixture to a blender or food processor. Blend until you reach your desired consistency. This can take anywhere from 2 to 10 minutes, depending on how coarse or smooth you prefer your mustard.
✅ It’s okay to leave a few whole seeds for texture—this is a ground mustard, not a smooth Dijon!
Step 3: Heat the Mustard
Pour the blended mustard into a saucepan and warm it over low heat. This helps thicken the mustard further and blends the flavors. Be sure to stir constantly to avoid scorching—it can burn quickly!
Heating isn’t for cooking the mustard, just thickening it slightly and making it ready for safe canning.
Step 4: Jar and Can Your Mustard
Ladle the hot mustard into sterilized 4-ounce jelly jars, leaving ½ inch of headspace. Wipe the rims with vinegar, apply hot lids and rings (finger-tight), and process in a boiling water bath for 10 minutes.
🫙 Four-ounce jars are a great size for household use and make thoughtful homemade gifts.
Step 5: Let It Age
Once cooled and sealed, let your jars sit for at least 2 to 4 weeks before using. This aging process mellows out the intense heat and bite of the fresh mustard, giving you a smooth, balanced flavor. If you love extra-strong mustard, you can try it after just 2 weeks.
🌶 Want to kick up the heat? Add a bit of horseradish during the blending process for a spicy twist.
Why Make Your Own Mustard?
Homemade ground mustard isn't just tastier than store-bought—it's also customizable, preservable, and more economical. You control the ingredients, spice levels, and consistency, and you can avoid unnecessary preservatives or additives. Plus, it's another great way to use your pantry staples like vinegar and salt for preserving.
Whether you're spreading it on sandwiches, stirring it into vinaigrettes, or slathering it on smoked pork, this homemade mustard brings a rustic, rich flavor that elevates any dish.
Final Thoughts
If you’ve been curious about making your own condiments or preserving more of your pantry staples, this homemade ground mustard is a perfect project to get started. Simple ingredients, minimal equipment, and big flavor—plus the satisfaction of filling your shelves with something homemade.
0 servings