Nutrition Facts
0 servings


If you're looking for a fun and delicious way to preserve summer's favorite fruit, look no further than this old-fashioned watermelon jelly recipe. In this guide from Jamie at Useful Knowledge, you'll learn how to make homemade watermelon jelly from scratch—and how to can it using a traditional method that ensures it gels beautifully and lasts on your pantry shelf.
Whether you're a homesteading enthusiast or just love trying new canning recipes, this step-by-step process is easy to follow and results in jelly that tastes just like a watermelon Jolly Rancher!
Ingredients You’ll Need
To make watermelon jelly that actually gels, you’ll need the following ingredients:
1/2 of a medium seedless watermelon (yields about 4 cups of juice)
4 oz lemon juice (from about 3 lemons)
4 1/2 cups sugar (raw cane sugar or white refined sugar)
2 boxes of Sure-Jell pectin
8 eight-ounce jelly jars with lids and bands
Step-by-Step Instructions
1. Prep the Watermelon
Start by scooping out the flesh from half of a watermelon. Use an ice cream scoop or a large spoon to dig it out and place it into a large bowl.
Crush the watermelon flesh until it’s mostly liquid. You can use a food processor, but hand-crushing works just fine.
2. Strain and Measure the Juice
Strain the crushed watermelon through a fine mesh strainer to remove seeds and pulp. Measure out 4 cups of watermelon juice. If you're short, crush more flesh to reach 4 cups.
3. Sterilize Jars and Warm Lids
Place your jelly jars in the oven at 250°F to sterilize them. Simultaneously, heat your jar lids in a pot of water on low to soften the seals.
")
4. Adjust the Acidity
Watermelon is not acidic enough on its own to make jelly that will set. To fix this, add 1/2 cup of fresh lemon juice to the juice. This lowers the pH to safe canning levels (around 3.8–3.1).
5. Add Pectin
Stir in 2 boxes of Sure-Jell to your watermelon-lemon mixture. Mix thoroughly to dissolve.
")
6. Bring to a Full Rolling Boil
Turn your burner to high and bring the mixture to a full rolling boil—one that can’t be stirred down. Stir occasionally to prevent scorching.
7. Add Sugar
Add 4 1/2 cups of sugar, stir well, and bring the mixture back to a full rolling boil. Stir constantly once boiling, and let it boil for exactly one minute.
8. Skim the Foam
Turn off the heat and skim off any foam that has formed on the surface of your jelly.
")
9. Fill the Jars
Using a funnel, pour the hot jelly into sterilized jars, leaving about 1/4-inch of headspace. Wipe the rims with a damp paper towel to ensure a clean seal.
10. Add Lids and Process
Place a warm lid on each jar and secure with a band. Turn each jar upside down for five minutes, then flip them right-side-up. This inversion method helps create a vacuum seal.
Within 15–30 minutes, you’ll start to hear the jars "ping" as they seal. Let the jars rest undisturbed for at least 8 hours or overnight to allow the jelly to fully set.
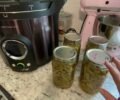
The Final Result
After resting, your watermelon jelly should have a perfect gel. The flavor is bold, sweet, and tastes remarkably like a watermelon candy. It’s the perfect way to preserve the essence of summer—and a fun addition to any homestead pantry.
Tips for Success
Always check pH when working with low-acid fruits like watermelon.
")
Be patient—let the jars seal and the jelly cool completely before testing consistency.
Store sealed jars in a cool, dark place for up to a year. Refrigerate after opening.
")
If you're looking for a fun and delicious way to preserve summer's favorite fruit, look no further than this old-fashioned watermelon jelly recipe. In this guide from Jamie at Useful Knowledge, you'll learn how to make homemade watermelon jelly from scratch—and how to can it using a traditional method that ensures it gels beautifully and lasts on your pantry shelf.
Whether you're a homesteading enthusiast or just love trying new canning recipes, this step-by-step process is easy to follow and results in jelly that tastes just like a watermelon Jolly Rancher!
Ingredients You’ll Need
To make watermelon jelly that actually gels, you’ll need the following ingredients:
1/2 of a medium seedless watermelon (yields about 4 cups of juice)
4 oz lemon juice (from about 3 lemons)
4 1/2 cups sugar (raw cane sugar or white refined sugar)
2 boxes of Sure-Jell pectin
8 eight-ounce jelly jars with lids and bands
Step-by-Step Instructions
1. Prep the Watermelon
Start by scooping out the flesh from half of a watermelon. Use an ice cream scoop or a large spoon to dig it out and place it into a large bowl.
Crush the watermelon flesh until it’s mostly liquid. You can use a food processor, but hand-crushing works just fine.
2. Strain and Measure the Juice
Strain the crushed watermelon through a fine mesh strainer to remove seeds and pulp. Measure out 4 cups of watermelon juice. If you're short, crush more flesh to reach 4 cups.
3. Sterilize Jars and Warm Lids
Place your jelly jars in the oven at 250°F to sterilize them. Simultaneously, heat your jar lids in a pot of water on low to soften the seals.
4. Adjust the Acidity
Watermelon is not acidic enough on its own to make jelly that will set. To fix this, add 1/2 cup of fresh lemon juice to the juice. This lowers the pH to safe canning levels (around 3.8–3.1).
5. Add Pectin
Stir in 2 boxes of Sure-Jell to your watermelon-lemon mixture. Mix thoroughly to dissolve.
6. Bring to a Full Rolling Boil
Turn your burner to high and bring the mixture to a full rolling boil—one that can’t be stirred down. Stir occasionally to prevent scorching.
7. Add Sugar
Add 4 1/2 cups of sugar, stir well, and bring the mixture back to a full rolling boil. Stir constantly once boiling, and let it boil for exactly one minute.
8. Skim the Foam
Turn off the heat and skim off any foam that has formed on the surface of your jelly.
9. Fill the Jars
Using a funnel, pour the hot jelly into sterilized jars, leaving about 1/4-inch of headspace. Wipe the rims with a damp paper towel to ensure a clean seal.
10. Add Lids and Process
Place a warm lid on each jar and secure with a band. Turn each jar upside down for five minutes, then flip them right-side-up. This inversion method helps create a vacuum seal.
Within 15–30 minutes, you’ll start to hear the jars "ping" as they seal. Let the jars rest undisturbed for at least 8 hours or overnight to allow the jelly to fully set.
The Final Result
After resting, your watermelon jelly should have a perfect gel. The flavor is bold, sweet, and tastes remarkably like a watermelon candy. It’s the perfect way to preserve the essence of summer—and a fun addition to any homestead pantry.
Tips for Success
Always check pH when working with low-acid fruits like watermelon.
Be patient—let the jars seal and the jelly cool completely before testing consistency.
Store sealed jars in a cool, dark place for up to a year. Refrigerate after opening.
0 servings