Nutrition Facts
0 servings


If you're a fan of pickled vegetables, you may have noticed that pickled pearl onions have become harder to find in grocery stores. Once a common item in cocktail bars and pantries, these tangy little onions seem to have disappeared from shelves in recent years. While you can still buy them online, they often come with a hefty price tag. Fortunately, making pickled pearl onions at home is simple, cost-effective, and rewarding.
In this guide, we’ll walk you through the entire process—from preparing the onions to making the brine and canning them for long-term storage. Plus, we’ll share a handy trick to make peeling all those tiny onions much easier!
Why Make Pickled Pearl Onions?
Pickled pearl onions are perfect for adding a burst of flavor to cocktails (like a classic Gibson martini), charcuterie boards, and even savory dishes. Making them yourself ensures they’re fresh, customizable, and free from unnecessary preservatives.
Ingredients for Pickled Pearl Onions
To make a batch of delicious pickled pearl onions, you'll need:
5 lbs (80 oz) of pearl onions (white, gold, or a mix)
5 1/2 cups white vinegar (5% acidity)
1 cup water
2 teaspoons kosher salt
")
2 cups white sugar (adjust to taste for less sweetness)
8 teaspoons mustard seed
4 teaspoons celery seed
1 tablespoon black peppercorns (optional)
Calcium chloride (Pickle Crisp, optional for extra crunch)
Step 1: Prepping the Onions
Peeling pearl onions can be tedious, but blanching them makes the process much easier.
")
Bring a large pot of water to a boil.
Drop small batches of pearl onions into the boiling water for exactly 1 minute
")
Immediately transfer the onions to an ice water bath to halt the cooking process.
Once cooled, trim the root end of each onion and pinch the onion out of its skin. Trim any excess stem if necessary.
Step 2: Making the Pickling Brine
In a large stockpot, combine vinegar, water, salt, sugar, mustard seed, celery seed, and peppercorns.
Bring the mixture to a boil and let it simmer for 3 minutes.
Add the peeled onions to the brine and cook for another 3 minutes.
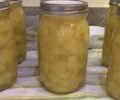
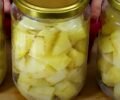
Step 3: Canning the Pickled Onions
Preheat your pint jars in a canner to keep them warm.
Using a slotted spoon, pack the onions into the jars, leaving about 1 inch of space at the top.
(Optional) Add 1/8 teaspoon of Pickle Crisp to each pint jar to maintain crispness.
")
Ladle the hot brine into each jar, leaving 1/2 inch of headspace.
Use a bubble remover tool to eliminate any trapped air.
Wipe the rims of the jars with a damp paper towel to ensure a clean seal.
Place lids on jars and screw the rings on until fingertip tight.
")
Step 4: Water Bath Canning Process
Ensure the water temperature in your canner is similar to the temperature of your jars to prevent breakage.
Submerge the jars in the canner, ensuring they are covered by at least 1 inch of water.
Bring to a full rolling boil and process the jars for 10 minutes.
After processing, remove the jars and place them on a folded towel to cool.
Listen for the signature “pop” sound, indicating a successful seal.
Storage and Enjoying Your Pickled Onions
Let the jars sit for at least a week before opening to allow the flavors to fully develop. Properly sealed jars can be stored in a cool, dark place for up to a year. If a jar fails to seal, store it in the refrigerator and use it first.
Final Thoughts
Pickled pearl onions are a fantastic addition to any pantry, and making them at home ensures you always have a supply of this classic garnish. Whether you enjoy them in cocktails or as a flavorful snack, this easy-to-follow recipe will help you create a delicious, homemade version of this timeless favorite.
")
If you're a fan of pickled vegetables, you may have noticed that pickled pearl onions have become harder to find in grocery stores. Once a common item in cocktail bars and pantries, these tangy little onions seem to have disappeared from shelves in recent years. While you can still buy them online, they often come with a hefty price tag. Fortunately, making pickled pearl onions at home is simple, cost-effective, and rewarding.
In this guide, we’ll walk you through the entire process—from preparing the onions to making the brine and canning them for long-term storage. Plus, we’ll share a handy trick to make peeling all those tiny onions much easier!
Why Make Pickled Pearl Onions?
Pickled pearl onions are perfect for adding a burst of flavor to cocktails (like a classic Gibson martini), charcuterie boards, and even savory dishes. Making them yourself ensures they’re fresh, customizable, and free from unnecessary preservatives.
Ingredients for Pickled Pearl Onions
To make a batch of delicious pickled pearl onions, you'll need:
5 lbs (80 oz) of pearl onions (white, gold, or a mix)
5 1/2 cups white vinegar (5% acidity)
1 cup water
2 teaspoons kosher salt
2 cups white sugar (adjust to taste for less sweetness)
8 teaspoons mustard seed
4 teaspoons celery seed
1 tablespoon black peppercorns (optional)
Calcium chloride (Pickle Crisp, optional for extra crunch)
Step 1: Prepping the Onions
Peeling pearl onions can be tedious, but blanching them makes the process much easier.
Bring a large pot of water to a boil.
Drop small batches of pearl onions into the boiling water for exactly 1 minute
Immediately transfer the onions to an ice water bath to halt the cooking process.
Once cooled, trim the root end of each onion and pinch the onion out of its skin. Trim any excess stem if necessary.
Step 2: Making the Pickling Brine
In a large stockpot, combine vinegar, water, salt, sugar, mustard seed, celery seed, and peppercorns.
Bring the mixture to a boil and let it simmer for 3 minutes.
Add the peeled onions to the brine and cook for another 3 minutes.
Step 3: Canning the Pickled Onions
Preheat your pint jars in a canner to keep them warm.
Using a slotted spoon, pack the onions into the jars, leaving about 1 inch of space at the top.
(Optional) Add 1/8 teaspoon of Pickle Crisp to each pint jar to maintain crispness.
Ladle the hot brine into each jar, leaving 1/2 inch of headspace.
Use a bubble remover tool to eliminate any trapped air.
Wipe the rims of the jars with a damp paper towel to ensure a clean seal.
Place lids on jars and screw the rings on until fingertip tight.
Step 4: Water Bath Canning Process
Ensure the water temperature in your canner is similar to the temperature of your jars to prevent breakage.
Submerge the jars in the canner, ensuring they are covered by at least 1 inch of water.
Bring to a full rolling boil and process the jars for 10 minutes.
After processing, remove the jars and place them on a folded towel to cool.
Listen for the signature “pop” sound, indicating a successful seal.
Storage and Enjoying Your Pickled Onions
Let the jars sit for at least a week before opening to allow the flavors to fully develop. Properly sealed jars can be stored in a cool, dark place for up to a year. If a jar fails to seal, store it in the refrigerator and use it first.
Final Thoughts
Pickled pearl onions are a fantastic addition to any pantry, and making them at home ensures you always have a supply of this classic garnish. Whether you enjoy them in cocktails or as a flavorful snack, this easy-to-follow recipe will help you create a delicious, homemade version of this timeless favorite.
0 servings