Nutrition Facts
0 servings


If you’ve never tried garlic jelly before, you’re in for a savory surprise. This small-batch roasted garlic jelly recipe is a unique and delicious way to preserve the rich flavor of garlic with a hint of sweetness—perfect for spreading on burgers, crackers, or cheese boards.
")
In this post, we’re teaming up with Kettle’s Kitchen in a fun jam and jelly collaboration, and Natasha is sharing her step-by-step process for making this gourmet-style jelly right at home. Inspired by the Ball Guide to Preserving, this recipe includes a personal twist: a splash of balsamic vinegar for added depth and complexity.
Why Make Garlic Jelly?
Most people associate jellies with sweet fruits, but savory jellies like garlic jelly are incredibly versatile. They pair beautifully with grilled meats, roasted vegetables, artisan cheeses, and even charcuterie boards. Garlic jelly also makes a fantastic edible gift for food lovers.
Ingredients You’ll Need
Here’s what you need to make this roasted garlic jelly:
3 whole bulbs of garlic
1 ½ cups white distilled vinegar (at least 5% acidity)
½ cup balsamic vinegar (Natasha used a 6% acidity balsamic)
5 cups sugar
1 packet liquid pectin (like Sure-Jell or your favorite brand)
A pinch of salt and pepper
Olive oil for roasting
Note: Roasting the garlic adds sweetness and mellows the pungent bite, creating a richer, more balanced flavor.
Equipment Checklist
Water bath canner
Sterilized jelly jars with lids (Natasha used Four Jars brand)
Vitamix or food processor
Oven preheated to 425°F
Foil for roasting garlic
Jar lifter, ladle, and canning funnel
Canning journal (optional but fun for tracking your preserving projects!)
Step-by-Step: How to Make Roasted Garlic Jelly
1. Roast the Garlic
Cut the tops off the garlic bulbs.
")
Drizzle with olive oil, sprinkle with salt and pepper, and wrap in foil.
Roast at 425°F for 15 minutes.
Natasha doubled her batch and roasted extra for dinner—brilliant multitasking!
2. Prepare the Vinegar Base
Measure 1 ½ cups of white vinegar.
In a separate cup, measure ½ cup balsamic vinegar.
")
Set aside the balsamic vinegar for blending with the roasted garlic.
3. Puree the Garlic
Once roasted and cooled, squeeze the garlic cloves into a blender.
Add the ½ cup balsamic vinegar.
Blend until smooth.
The result is a heavenly-smelling garlic purée that forms the heart of your jelly.
4. Cook the Jelly
In a heavy-bottomed pot, combine:
Garlic purée
1 ½ cups white vinegar
5 cups sugar
Stir constantly and bring to a boil.
Once boiling, add the liquid pectin.
Return to a rolling boil for 1 minute.
Skim off any foam if needed.
5. Jar the Jelly
Quickly ladle the hot jelly into sterilized jars, leaving ¼ inch headspace.
Wipe rims clean with vinegar.
Apply lids and rings (finger-tight only).
Pro Tip: This part goes fast—Natasha calls it the “Boogie Time” moment. Be ready!
6. Process in a Water Bath
Place jars in a boiling water bath canner.
Process for 10 minutes.
Remove jars and let cool for 12–24 hours on a towel-lined surface.
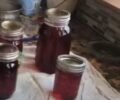
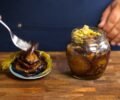
Final Results: Sweet, Savory, and Set!
After 18–20 hours, Natasha’s garlic jelly was beautifully set and bursting with flavor. She recommends trying it on:
Burgers
Charcuterie boards
Triscuits with cheese
Holiday appetizers like 4th of July spreads
Tips for Garlic Jelly Success
Use high-acid vinegar: Always use vinegar with 5% acidity or more for safe canning.
")
Sterilize your jars properly: Natasha sterilizes her jars beforehand and keeps them hot in warm water.
")
If you’ve never tried garlic jelly before, you’re in for a savory surprise. This small-batch roasted garlic jelly recipe is a unique and delicious way to preserve the rich flavor of garlic with a hint of sweetness—perfect for spreading on burgers, crackers, or cheese boards.
In this post, we’re teaming up with Kettle’s Kitchen in a fun jam and jelly collaboration, and Natasha is sharing her step-by-step process for making this gourmet-style jelly right at home. Inspired by the Ball Guide to Preserving, this recipe includes a personal twist: a splash of balsamic vinegar for added depth and complexity.
Why Make Garlic Jelly?
Most people associate jellies with sweet fruits, but savory jellies like garlic jelly are incredibly versatile. They pair beautifully with grilled meats, roasted vegetables, artisan cheeses, and even charcuterie boards. Garlic jelly also makes a fantastic edible gift for food lovers.
Ingredients You’ll Need
Here’s what you need to make this roasted garlic jelly:
3 whole bulbs of garlic
1 ½ cups white distilled vinegar (at least 5% acidity)
½ cup balsamic vinegar (Natasha used a 6% acidity balsamic)
5 cups sugar
1 packet liquid pectin (like Sure-Jell or your favorite brand)
A pinch of salt and pepper
Olive oil for roasting
Note: Roasting the garlic adds sweetness and mellows the pungent bite, creating a richer, more balanced flavor.
Equipment Checklist
Water bath canner
Sterilized jelly jars with lids (Natasha used Four Jars brand)
Vitamix or food processor
Oven preheated to 425°F
Foil for roasting garlic
Jar lifter, ladle, and canning funnel
Canning journal (optional but fun for tracking your preserving projects!)
Step-by-Step: How to Make Roasted Garlic Jelly
1. Roast the Garlic
Cut the tops off the garlic bulbs.
Drizzle with olive oil, sprinkle with salt and pepper, and wrap in foil.
Roast at 425°F for 15 minutes.
Natasha doubled her batch and roasted extra for dinner—brilliant multitasking!
2. Prepare the Vinegar Base
Measure 1 ½ cups of white vinegar.
In a separate cup, measure ½ cup balsamic vinegar.
Set aside the balsamic vinegar for blending with the roasted garlic.
3. Puree the Garlic
Once roasted and cooled, squeeze the garlic cloves into a blender.
Add the ½ cup balsamic vinegar.
Blend until smooth.
The result is a heavenly-smelling garlic purée that forms the heart of your jelly.
4. Cook the Jelly
In a heavy-bottomed pot, combine:
Garlic purée
1 ½ cups white vinegar
5 cups sugar
Stir constantly and bring to a boil.
Once boiling, add the liquid pectin.
Return to a rolling boil for 1 minute.
Skim off any foam if needed.
5. Jar the Jelly
Quickly ladle the hot jelly into sterilized jars, leaving ¼ inch headspace.
Wipe rims clean with vinegar.
Apply lids and rings (finger-tight only).
Pro Tip: This part goes fast—Natasha calls it the “Boogie Time” moment. Be ready!
6. Process in a Water Bath
Place jars in a boiling water bath canner.
Process for 10 minutes.
Remove jars and let cool for 12–24 hours on a towel-lined surface.
Final Results: Sweet, Savory, and Set!
After 18–20 hours, Natasha’s garlic jelly was beautifully set and bursting with flavor. She recommends trying it on:
Burgers
Charcuterie boards
Triscuits with cheese
Holiday appetizers like 4th of July spreads
Tips for Garlic Jelly Success
Use high-acid vinegar: Always use vinegar with 5% acidity or more for safe canning.
Sterilize your jars properly: Natasha sterilizes her jars beforehand and keeps them hot in warm water.
0 servings