Nutrition Facts
0 servings


If you’ve ever found yourself with a big batch of sweet onions and no idea what to do with them, I’ve got the perfect solution for you—caramelized onion canning! On a recent Saturday morning, while the internet struggled out here in the boonies and Mr. Brown was off dove hunting, I got to work preserving about 50 pounds of Spanish sweet onions. It was a long process, but let me tell you, it was so worth it.
Prepping a Mountain of Onions
We started by slicing and dicing about half of the onions using a mandoline slicer and a simple Walmart vegetable dicer. My sweet friend Tanya gifted me that mandoline, and it's been a lifesaver! We were laughing and crying (literally) through the process—the house smelled like an onion farm, and we tried every trick in the book to keep from crying. I’m telling y’all, next time, I’m breaking out some goggles!
Some of those onions went into the freezer, vacuum-sealed into handy cup-sized portions for weeknight meals. But I knew I had to can the rest to really make the most of them.
Easy Slow Cooker Caramelized Onions
Here’s where it gets good: caramelizing onions in a slow cooker overnight. I sliced them thin and loaded up my six-quart slow cooker, even a little above the brim. I added a stick of butter, set it to cook for eight hours, and let the magic happen while I slept.
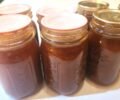
By morning, the onions were perfectly golden and had cooked down beautifully. I added a tablespoon of roasted garlic powder and about half a cup of Worcestershire sauce, which gave them a rich, savory flavor. You can skip these additions, but they really add depth.
")
Canning Caramelized Onions: Step-by-Step
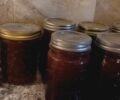
I chose to can these in half-pint jars—just the right amount for Mr. Brown and me. Here’s how you can do it too:
")
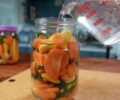
Fill Your Jars – Make sure your jars are hot and ready. Fill them with your caramelized onions, leaving about ½ inch of headspace.
Add Onion Broth – Don’t forget the broth! It’s packed with flavor and makes every jar even better.
De-Bubble and Clean – Use a tool to de-bubble around the edges and through the center, then wipe the rims with vinegar or warm water.
Seal and Process – Add your lids and rings finger-tight. Process at 10 pounds of pressure (adjust for altitude) for 70 minutes.
Why You’ll Love Canned Caramelized Onions
These jars of golden goodness are incredibly versatile. Warm them up and spoon them over:
Hamburger patties or steak
Philly cheesesteaks or patty melts
Chili dogs or sausages
Roasts (added near the end of cooking)
Scrambled eggs or omelets
They also make a delicious topping for apple chicken sausage—my favorite is from Sam’s Club and has chunks of Granny Smith apples!
")
As someone who prefers ingredient canning over full meals, I love having these onions on hand to build dishes from scratch. They save time, reduce waste, and add flavor to everything.
")
If you’ve ever found yourself with a big batch of sweet onions and no idea what to do with them, I’ve got the perfect solution for you—caramelized onion canning! On a recent Saturday morning, while the internet struggled out here in the boonies and Mr. Brown was off dove hunting, I got to work preserving about 50 pounds of Spanish sweet onions. It was a long process, but let me tell you, it was so worth it.
Prepping a Mountain of Onions
We started by slicing and dicing about half of the onions using a mandoline slicer and a simple Walmart vegetable dicer. My sweet friend Tanya gifted me that mandoline, and it's been a lifesaver! We were laughing and crying (literally) through the process—the house smelled like an onion farm, and we tried every trick in the book to keep from crying. I’m telling y’all, next time, I’m breaking out some goggles!
Some of those onions went into the freezer, vacuum-sealed into handy cup-sized portions for weeknight meals. But I knew I had to can the rest to really make the most of them.
Easy Slow Cooker Caramelized Onions
Here’s where it gets good: caramelizing onions in a slow cooker overnight. I sliced them thin and loaded up my six-quart slow cooker, even a little above the brim. I added a stick of butter, set it to cook for eight hours, and let the magic happen while I slept.
By morning, the onions were perfectly golden and had cooked down beautifully. I added a tablespoon of roasted garlic powder and about half a cup of Worcestershire sauce, which gave them a rich, savory flavor. You can skip these additions, but they really add depth.
Canning Caramelized Onions: Step-by-Step
I chose to can these in half-pint jars—just the right amount for Mr. Brown and me. Here’s how you can do it too:
Fill Your Jars – Make sure your jars are hot and ready. Fill them with your caramelized onions, leaving about ½ inch of headspace.
Add Onion Broth – Don’t forget the broth! It’s packed with flavor and makes every jar even better.
De-Bubble and Clean – Use a tool to de-bubble around the edges and through the center, then wipe the rims with vinegar or warm water.
Seal and Process – Add your lids and rings finger-tight. Process at 10 pounds of pressure (adjust for altitude) for 70 minutes.
Why You’ll Love Canned Caramelized Onions
These jars of golden goodness are incredibly versatile. Warm them up and spoon them over:
Hamburger patties or steak
Philly cheesesteaks or patty melts
Chili dogs or sausages
Roasts (added near the end of cooking)
Scrambled eggs or omelets
They also make a delicious topping for apple chicken sausage—my favorite is from Sam’s Club and has chunks of Granny Smith apples!
As someone who prefers ingredient canning over full meals, I love having these onions on hand to build dishes from scratch. They save time, reduce waste, and add flavor to everything.
0 servings