Nutrition Facts
0 servings

By Tracy from Nova Scotia Living
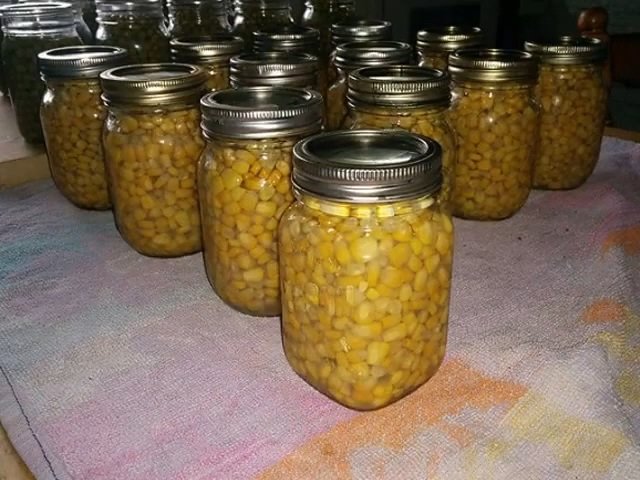
If your freezer is full and you’ve stocked up on frozen vegetables during a sale, pressure canning might be the perfect solution to free up space and preserve your food for the long haul. In this guide, we’ll walk you through exactly how to pressure can frozen corn, step-by-step, right from Tracy’s busy kitchen at Nova Scotia Living.
")
Why Can Frozen Corn?
You might be wondering: Why not just keep frozen corn in the freezer? For Tracy, the answer is simple—no more freezer space. When your fridge and deep freezer are packed, pressure canning becomes a lifesaver. Plus, pressure-canned corn is fully cooked, making it quick and easy to reheat for meals.
Supplies You'll Need
Organic frozen corn (or any frozen corn you have on hand)
Clean jars (no need to sterilize if pressure canning)
Kosher or pickling salt (non-iodized only)
Clean towels
Wooden or plastic utensil for de-bubbling
Vinegar or hot water for wiping rims
Pressure canner with manual
Step-by-Step Instructions for Pressure Canning Frozen Corn
1. Prep Your Jars
Wash jars thoroughly. Sterilization is not necessary for pressure canning because the canner will do it for you.
Fill each jar with frozen corn, leaving about an inch of headspace at the top.
Important: Thaw your frozen vegetables before canning. Canning them while still frozen can lead to broken jars due to temperature shock.
2. Add Salt (Optional)
Add ½ teaspoon of pickling or kosher salt to each jar. Avoid iodized salt—it can discolor your food and affect the taste.
3. Rinse Your Corn
Even if it's organic or pre-packaged, rinse your corn well. You don’t know what it’s been exposed to during processing.
4. Fill Jars With Water
Use clean water to top up the jars, maintaining 1-inch headspace.
De-bubble each jar with a wooden or plastic utensil to release trapped air.
5. Clean the Rims
Wipe the rims with vinegar or hot water to ensure a clean seal. Check for any cracks or chips on the jars.
")
6. Apply Lids and Rings
Place hot, clean lids and rings onto jars. Tighten rings to finger-tight—not too tight, not too loose.
7. Load Your Pressure Canner
Add the required amount of water for your specific model (Tracy uses a 22-quart Mirro).
Ensure the gasket and vent are clean and clear.
Lock the lid and turn the heat on high.
8. Build Pressure
Wait until a steady stream of steam vents out. Let it vent for 10 minutes, then add your weighted gauge.
Tracy uses a 10-pound weight, but check your elevation to determine the correct pressure for your area.
9. Process the Corn
Once the weight starts “jiggling,” reduce heat so it jiggles 2 to 3 times per minute.
Set your timer for 55 minutes—the required processing time for low-acid foods like corn.
10. Cool Down Safely
When the timer ends, turn off the heat but don’t remove the lid or the weight. Let the pressure drop naturally.
Only open the canner once the vent (or “bobber”) drops completely.
After Canning: Final Steps
Carefully remove the jars and place them on a towel. Don’t place hot jars on a cold surface—they could shatter.
Let them cool undisturbed for 12 to 24 hours.
Once cooled, remove the rings. This prevents rust and helps you detect a bad seal.
")
Wipe jars down and label them with the date before storing in your pantry or cold storage.
Tips From Tracy’s Kitchen
Always double-check for cracks in jars before canning.
Don’t be afraid to take advantage of sales on frozen veggies—it’s a smart way to stock your pantry.
Tracy recommends using vinegar on jar rims because that’s what her mom always did—and mom knows best!
If you're new to pressure canning, stay nearby while it's processing. Safety first!
Final Thoughts
Pressure canning frozen corn is an easy and cost-effective way to make room in your freezer while stocking your pantry with shelf-stable vegetables. Tracy from Nova Scotia Living makes the process approachable, fun, and full of practical wisdom.
Peace, love, and happiness—happy canning!
")
By Tracy from Nova Scotia Living
If your freezer is full and you’ve stocked up on frozen vegetables during a sale, pressure canning might be the perfect solution to free up space and preserve your food for the long haul. In this guide, we’ll walk you through exactly how to pressure can frozen corn, step-by-step, right from Tracy’s busy kitchen at Nova Scotia Living.
Why Can Frozen Corn?
You might be wondering: Why not just keep frozen corn in the freezer? For Tracy, the answer is simple—no more freezer space. When your fridge and deep freezer are packed, pressure canning becomes a lifesaver. Plus, pressure-canned corn is fully cooked, making it quick and easy to reheat for meals.
Supplies You'll Need
Organic frozen corn (or any frozen corn you have on hand)
Clean jars (no need to sterilize if pressure canning)
Kosher or pickling salt (non-iodized only)
Clean towels
Wooden or plastic utensil for de-bubbling
Vinegar or hot water for wiping rims
Pressure canner with manual
Step-by-Step Instructions for Pressure Canning Frozen Corn
1. Prep Your Jars
Wash jars thoroughly. Sterilization is not necessary for pressure canning because the canner will do it for you.
Fill each jar with frozen corn, leaving about an inch of headspace at the top.
Important: Thaw your frozen vegetables before canning. Canning them while still frozen can lead to broken jars due to temperature shock.
2. Add Salt (Optional)
Add ½ teaspoon of pickling or kosher salt to each jar. Avoid iodized salt—it can discolor your food and affect the taste.
3. Rinse Your Corn
Even if it's organic or pre-packaged, rinse your corn well. You don’t know what it’s been exposed to during processing.
4. Fill Jars With Water
Use clean water to top up the jars, maintaining 1-inch headspace.
De-bubble each jar with a wooden or plastic utensil to release trapped air.
5. Clean the Rims
Wipe the rims with vinegar or hot water to ensure a clean seal. Check for any cracks or chips on the jars.
6. Apply Lids and Rings
Place hot, clean lids and rings onto jars. Tighten rings to finger-tight—not too tight, not too loose.
7. Load Your Pressure Canner
Add the required amount of water for your specific model (Tracy uses a 22-quart Mirro).
Ensure the gasket and vent are clean and clear.
Lock the lid and turn the heat on high.
8. Build Pressure
Wait until a steady stream of steam vents out. Let it vent for 10 minutes, then add your weighted gauge.
Tracy uses a 10-pound weight, but check your elevation to determine the correct pressure for your area.
9. Process the Corn
Once the weight starts “jiggling,” reduce heat so it jiggles 2 to 3 times per minute.
Set your timer for 55 minutes—the required processing time for low-acid foods like corn.
10. Cool Down Safely
When the timer ends, turn off the heat but don’t remove the lid or the weight. Let the pressure drop naturally.
Only open the canner once the vent (or “bobber”) drops completely.
After Canning: Final Steps
Carefully remove the jars and place them on a towel. Don’t place hot jars on a cold surface—they could shatter.
Let them cool undisturbed for 12 to 24 hours.
Once cooled, remove the rings. This prevents rust and helps you detect a bad seal.
Wipe jars down and label them with the date before storing in your pantry or cold storage.
Tips From Tracy’s Kitchen
Always double-check for cracks in jars before canning.
Don’t be afraid to take advantage of sales on frozen veggies—it’s a smart way to stock your pantry.
Tracy recommends using vinegar on jar rims because that’s what her mom always did—and mom knows best!
If you're new to pressure canning, stay nearby while it's processing. Safety first!
Final Thoughts
Pressure canning frozen corn is an easy and cost-effective way to make room in your freezer while stocking your pantry with shelf-stable vegetables. Tracy from Nova Scotia Living makes the process approachable, fun, and full of practical wisdom.
Peace, love, and happiness—happy canning!
0 servings