Nutrition Facts
0 servings


Welcome to Part Three of the Complete Guide to Water Bath Canning! In this installment, we're diving into one of the most popular canning recipes around: homemade salsa. But this isn’t just any salsa—this is a guide to safely customizing salsa to suit your taste preferences or dietary needs while staying within tested canning safety guidelines.
Whether you're new to water bath canning or looking to fine-tune your skills, this tutorial will show you how to make safe substitutions and create a delicious, shelf-stable salsa that’s perfect for your pantry.
Why Start with a Tested Salsa Recipe?
The foundation of safe home canning is starting with a research-tested recipe. In this case, we're using a university-approved salsa recipe as a base, and then making smart substitutions. By understanding the role of acidity and ingredient ratios, you can adjust flavor without compromising safety.
Ingredients and Smart Substitutions
Here’s what makes this recipe special:
3 lbs of Roma tomatoes: Roma tomatoes are ideal for salsa because they’re meatier, have higher natural pectin, and contain less water—leading to a better texture.
")
Peppers: Instead of the mild bell peppers in the original recipe, this version uses a spicy blend of Anaheim, Serrano, and jalapeños for extra heat.
No onions: If you're not a fan of onions (like me!), you can safely reduce or omit them. I've doubled the garlic instead.
1 can of tomato paste
1 cup of red wine vinegar (5% acidity): You can swap vinegars as long as they are labeled with at least 5% acidity.
½ cup chopped cilantro
1 tsp toasted cumin seeds: Toasting and grinding whole seeds gives a deeper, fresher flavor.
Note: Adjustments to low-acid ingredients like onions, peppers, and garlic are okay in moderation, as long as the required acidity is maintained.
")
Roasting for Flavor and Texture
One of the best upgrades you can make to your homemade salsa is roasting the vegetables.
Roasting Instructions:
Set your oven to broil.
Place peppers and garlic on a foil-lined baking sheet and poke holes in the peppers to prevent bursting.
Broil for 8 minutes, turn, and broil for another 8 minutes.
Transfer to a bowl and cover with foil to steam for easier peeling.
Roast the tomatoes (cored and cleaned) for 15 minutes.
Peel garlic and roasted peppers, removing most seeds.
Dice everything and place into a large pot.
Cooking and Blending
Add your peeled, roasted tomatoes to the pot along with:
Garlic
Peppers
Cumin
Tomato paste
Vinegar
")
Use an immersion blender to break down the mixture to your desired texture, then cook for 15 minutes to activate the natural pectin. Add cilantro and salt in the last 5 minutes. You may adjust salt and sugar levels (but avoid changing them in fermented pickle recipes).
Water Bath Canning Instructions
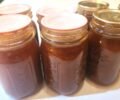
Fill clean jars with hot salsa.
Wipe the rims, add lids, and screw on bands until you feel resistance.
")
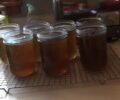
Place jars in a pot of hot (not boiling) water.
Once boiling, process for 20 minutes, adding 1 minute per 1,000 feet of elevation.
")
Turn off the heat, remove the lid, and wait 5 minutes.
Remove jars and let them sit for 12–24 hours on the counter to seal.
Once cool, check the seals: remove the ring, lift the lid slightly, and give the jar a gentle shake. A properly sealed jar won’t budge.
Final Thoughts
Customizing your salsa recipe for flavor, diet, or spice level doesn't mean compromising on safety. By following these tested methods and knowing what adjustments are safe, you can enjoy a spicy, onion-free, roasted salsa that’s uniquely yours and shelf-stable for months.
")
Welcome to Part Three of the Complete Guide to Water Bath Canning! In this installment, we're diving into one of the most popular canning recipes around: homemade salsa. But this isn’t just any salsa—this is a guide to safely customizing salsa to suit your taste preferences or dietary needs while staying within tested canning safety guidelines.
Whether you're new to water bath canning or looking to fine-tune your skills, this tutorial will show you how to make safe substitutions and create a delicious, shelf-stable salsa that’s perfect for your pantry.
Why Start with a Tested Salsa Recipe?
The foundation of safe home canning is starting with a research-tested recipe. In this case, we're using a university-approved salsa recipe as a base, and then making smart substitutions. By understanding the role of acidity and ingredient ratios, you can adjust flavor without compromising safety.
Ingredients and Smart Substitutions
Here’s what makes this recipe special:
3 lbs of Roma tomatoes: Roma tomatoes are ideal for salsa because they’re meatier, have higher natural pectin, and contain less water—leading to a better texture.
Peppers: Instead of the mild bell peppers in the original recipe, this version uses a spicy blend of Anaheim, Serrano, and jalapeños for extra heat.
No onions: If you're not a fan of onions (like me!), you can safely reduce or omit them. I've doubled the garlic instead.
1 can of tomato paste
1 cup of red wine vinegar (5% acidity): You can swap vinegars as long as they are labeled with at least 5% acidity.
½ cup chopped cilantro
1 tsp toasted cumin seeds: Toasting and grinding whole seeds gives a deeper, fresher flavor.
Note: Adjustments to low-acid ingredients like onions, peppers, and garlic are okay in moderation, as long as the required acidity is maintained.
Roasting for Flavor and Texture
One of the best upgrades you can make to your homemade salsa is roasting the vegetables.
Roasting Instructions:
Set your oven to broil.
Place peppers and garlic on a foil-lined baking sheet and poke holes in the peppers to prevent bursting.
Broil for 8 minutes, turn, and broil for another 8 minutes.
Transfer to a bowl and cover with foil to steam for easier peeling.
Roast the tomatoes (cored and cleaned) for 15 minutes.
Peel garlic and roasted peppers, removing most seeds.
Dice everything and place into a large pot.
Cooking and Blending
Add your peeled, roasted tomatoes to the pot along with:
Garlic
Peppers
Cumin
Tomato paste
Vinegar
Use an immersion blender to break down the mixture to your desired texture, then cook for 15 minutes to activate the natural pectin. Add cilantro and salt in the last 5 minutes. You may adjust salt and sugar levels (but avoid changing them in fermented pickle recipes).
Water Bath Canning Instructions
Fill clean jars with hot salsa.
Wipe the rims, add lids, and screw on bands until you feel resistance.
Place jars in a pot of hot (not boiling) water.
Once boiling, process for 20 minutes, adding 1 minute per 1,000 feet of elevation.
Turn off the heat, remove the lid, and wait 5 minutes.
Remove jars and let them sit for 12–24 hours on the counter to seal.
Once cool, check the seals: remove the ring, lift the lid slightly, and give the jar a gentle shake. A properly sealed jar won’t budge.
Final Thoughts
Customizing your salsa recipe for flavor, diet, or spice level doesn't mean compromising on safety. By following these tested methods and knowing what adjustments are safe, you can enjoy a spicy, onion-free, roasted salsa that’s uniquely yours and shelf-stable for months.
0 servings