Nutrition Facts
0 servings


If you're a homesteader, gardener, or home cook, you probably appreciate the value of food preservation. Today, we're diving into pressure canning baked beans—a delicious and convenient way to store beans while experimenting with different flavors.
")
Why Pressure Can Baked Beans?
Beans are an excellent pantry staple, but dried beans can take hours to cook, especially if they're older. Some aged beans never soften properly, no matter how long you boil them. However, pressure canning ensures that even the oldest beans become tender and ready to eat straight from the jar.
")
Baked beans are a favorite for camping, cookouts, and easy weeknight meals. When making your own, you control the ingredients, adjusting sweetness, smokiness, or spice levels to match your preference.
")
Prepping Your Beans: Sorting, Soaking, and Cooking
Before canning, it's essential to prepare the beans properly. Here’s a simple process to follow:
")
Sort Your Beans: Remove any debris or damaged beans. If using older beans, be mindful that they may require extra soaking or a trick like adding baking soda to the soaking water to aid hydration.
")
Soak Overnight: Place beans in a bowl, cover with filtered water, and let them sit overnight. This step helps reduce cooking time and improve texture.
Pre-Cook the Beans: While some recipes call for baking before canning, a common alternative is a short pre-boil. A 2-minute parboil softens the beans slightly, ensuring they don’t become too mushy during pressure canning.
Choosing a Baked Bean Recipe
There are countless ways to prepare baked beans, with recipes varying in sweetness, acidity, and seasonings. Here are some recipe types you can try:
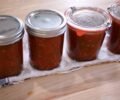
Molasses & Brown Sugar-Based: This version creates a rich, dark sauce with deep caramelized flavors. It often includes mustard and a bit of vinegar for balance.
Tomato-Based: Some recipes use ketchup or tomato sauce for a tangy, slightly sweet bean dish.
Traditional Homestyle: Featuring pork or bacon, onions, and a touch of molasses, this version closely resembles store-bought baked beans.
Pressure Canning Baked Beans
Regardless of the recipe, the canning process remains the same. Follow these steps for safe preservation:
Prepare the Sauce: Whether using molasses, tomato sauce, or another base, mix your ingredients and bring them to a simmer.
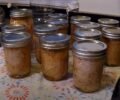
Fill the Jars: Add par-cooked beans to sterilized canning jars, leaving about 1 inch of headspace. Pour the hot sauce over the beans, ensuring all are well coated.
Remove Air Bubbles: Run a spatula or bubble remover tool through the jar to release trapped air.
Wipe Rims & Seal Jars: Clean the rims with a damp cloth, place new lids on, and screw on bands to fingertip-tightness.
Process in a Pressure Canner: Since beans are a low-acid food, they must be pressure canned for safety. Process pints at 10-15 PSI (depending on altitude) for 65 minutes.
Taste Testing & Final Thoughts
After experimenting with multiple batches, a clear favorite emerged—a sweet and smoky variety with bacon and extra molasses, reminiscent of classic store-bought baked beans. However, each variation had its strengths, making it a fun and customizable process.
")
By pressure canning baked beans at home, you ensure a delicious, preservative-free pantry staple, ready for your next camping trip or barbecue. Give it a try and tweak the recipes to find your perfect batch!
")
If you're a homesteader, gardener, or home cook, you probably appreciate the value of food preservation. Today, we're diving into pressure canning baked beans—a delicious and convenient way to store beans while experimenting with different flavors.
Why Pressure Can Baked Beans?
Beans are an excellent pantry staple, but dried beans can take hours to cook, especially if they're older. Some aged beans never soften properly, no matter how long you boil them. However, pressure canning ensures that even the oldest beans become tender and ready to eat straight from the jar.
Baked beans are a favorite for camping, cookouts, and easy weeknight meals. When making your own, you control the ingredients, adjusting sweetness, smokiness, or spice levels to match your preference.
Prepping Your Beans: Sorting, Soaking, and Cooking
Before canning, it's essential to prepare the beans properly. Here’s a simple process to follow:
Sort Your Beans: Remove any debris or damaged beans. If using older beans, be mindful that they may require extra soaking or a trick like adding baking soda to the soaking water to aid hydration.
Soak Overnight: Place beans in a bowl, cover with filtered water, and let them sit overnight. This step helps reduce cooking time and improve texture.
Pre-Cook the Beans: While some recipes call for baking before canning, a common alternative is a short pre-boil. A 2-minute parboil softens the beans slightly, ensuring they don’t become too mushy during pressure canning.
Choosing a Baked Bean Recipe
There are countless ways to prepare baked beans, with recipes varying in sweetness, acidity, and seasonings. Here are some recipe types you can try:
Molasses & Brown Sugar-Based: This version creates a rich, dark sauce with deep caramelized flavors. It often includes mustard and a bit of vinegar for balance.
Tomato-Based: Some recipes use ketchup or tomato sauce for a tangy, slightly sweet bean dish.
Traditional Homestyle: Featuring pork or bacon, onions, and a touch of molasses, this version closely resembles store-bought baked beans.
Pressure Canning Baked Beans
Regardless of the recipe, the canning process remains the same. Follow these steps for safe preservation:
Prepare the Sauce: Whether using molasses, tomato sauce, or another base, mix your ingredients and bring them to a simmer.
Fill the Jars: Add par-cooked beans to sterilized canning jars, leaving about 1 inch of headspace. Pour the hot sauce over the beans, ensuring all are well coated.
Remove Air Bubbles: Run a spatula or bubble remover tool through the jar to release trapped air.
Wipe Rims & Seal Jars: Clean the rims with a damp cloth, place new lids on, and screw on bands to fingertip-tightness.
Process in a Pressure Canner: Since beans are a low-acid food, they must be pressure canned for safety. Process pints at 10-15 PSI (depending on altitude) for 65 minutes.
Taste Testing & Final Thoughts
After experimenting with multiple batches, a clear favorite emerged—a sweet and smoky variety with bacon and extra molasses, reminiscent of classic store-bought baked beans. However, each variation had its strengths, making it a fun and customizable process.
By pressure canning baked beans at home, you ensure a delicious, preservative-free pantry staple, ready for your next camping trip or barbecue. Give it a try and tweak the recipes to find your perfect batch!
0 servings