
")
")
")
")
")
")
")


Nutrition Facts
0 servings
Related Recipes
-
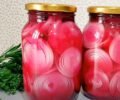
Easy Pickled Onions and Beets Recipe
By Kawther
-
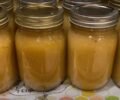
How to Make Homemade Applesauce: A Step-by-Step Guide
By Kawther
-
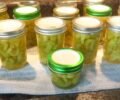
Canning Celery: A Step-by-Step Guide
By Kawther